# Show custom HTML and record values with the HTML component
> Add formatted text or your own HTML to a page, and insert record values, logged-in user fields, app variables and raw values such as an address city.
Source: https://tadabase.com/docs/pages/html
Status: Verified Nov 17, 2026. Checked against the current product
The **HTML** component holds text, links, tables and pictures that you write in an editor, or HTML you paste in. It can also show live values: fields of the record on the page, fields of the logged-in user, and app variables. You can use it on regular pages and on [PDF pages](https://tadabase.com/docs/pages/pdf-pages).
## Add an HTML component
1. **Open the page** In the **Page Builder**, open the page, layout or PDF page. Its **Content** tab opens.
2. **Pick a spot** In an empty column, click **Add Component**, or drag the component from the left panel into a column.
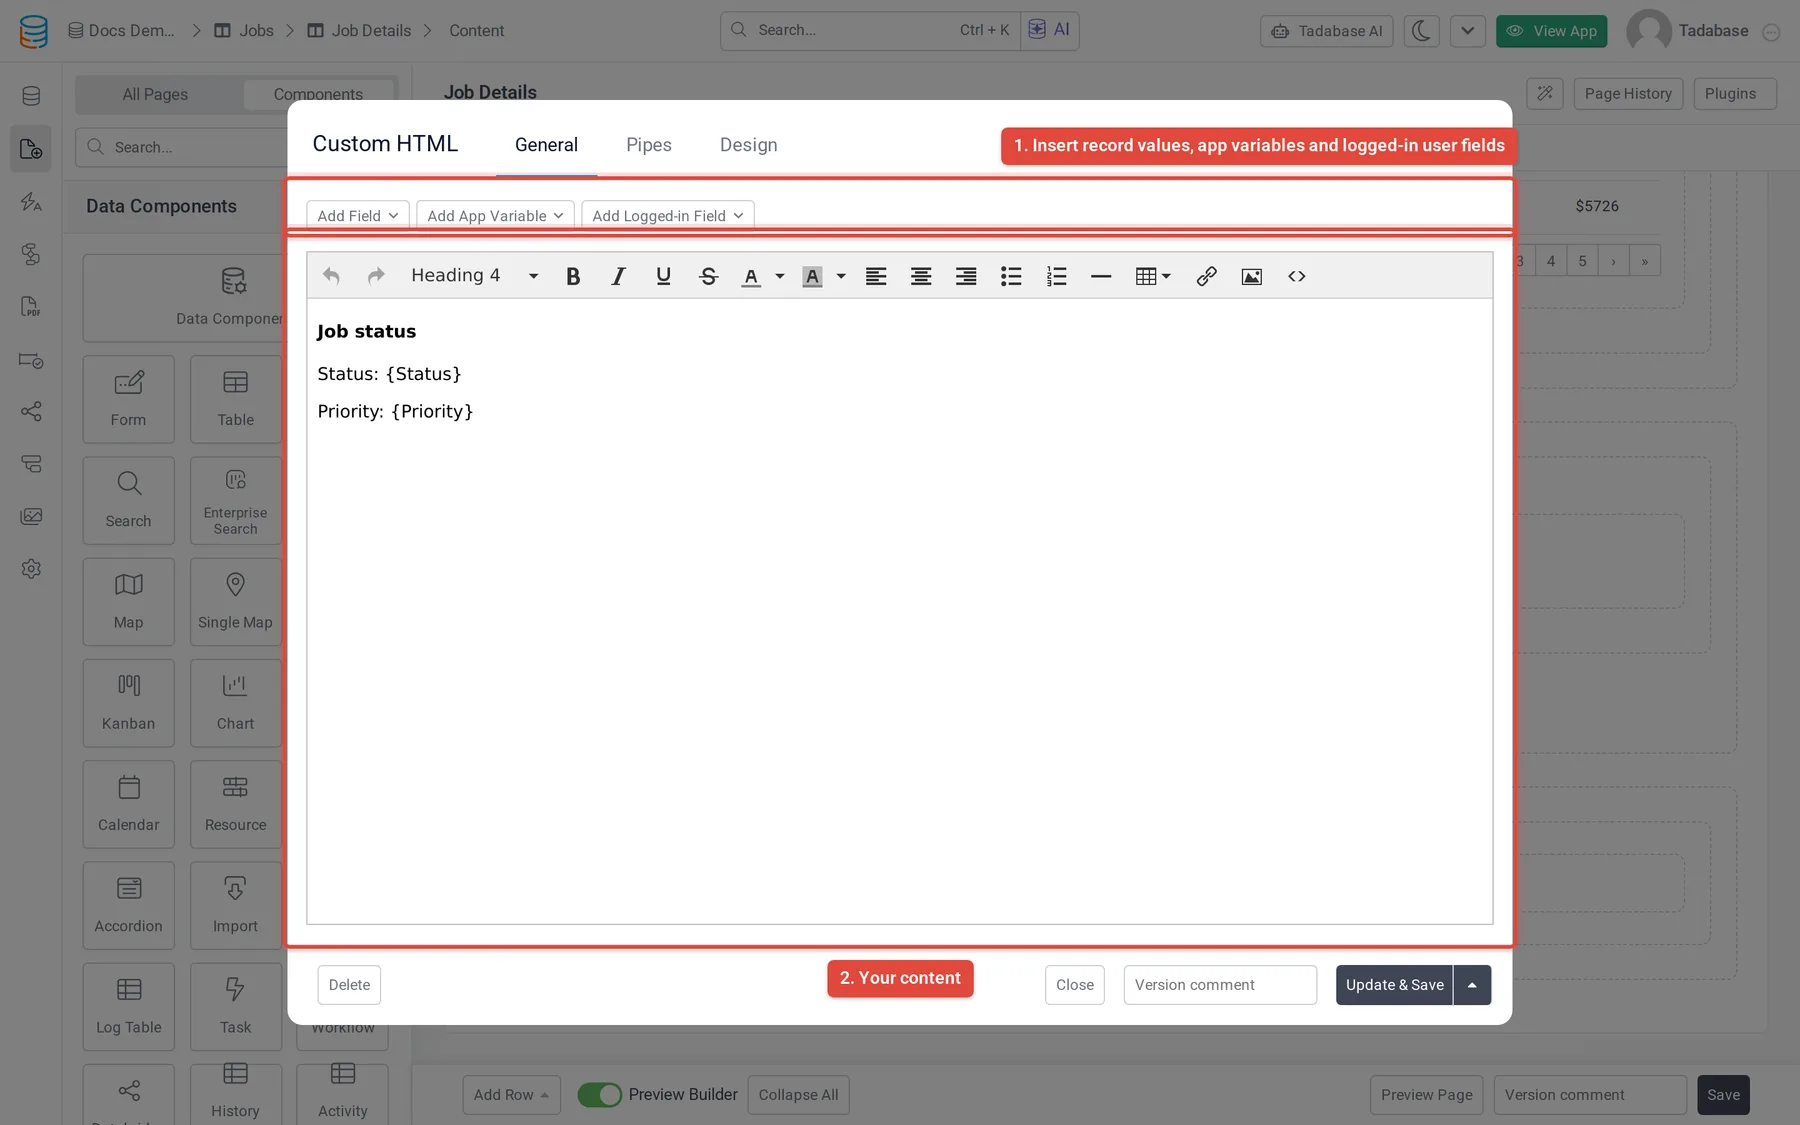
3. **Choose HTML** On the **Components** tab of the left panel, under **System Components**, click **HTML**. The **Custom HTML** window opens on the **General** tab.
4. **Write the content** Type and format your content in the editor. To work with the HTML itself, click the code button on the editor's toolbar.
5. **Insert values** Use **Add Field**, **Add App Variable** and **Add Logged-in Field** above the editor to insert values (see below). Each inserts a placeholder in curly brackets where your cursor is.
6. **Save** Click **Update & Save**.
## Values you can insert
| Kind | Placeholder | Shows |
| --- | --- | --- |
| **Record value** (formatted) | `{Email}` | The field of the record on the page, formatted the way a table shows it. An email shows as a link, a date in your date format. |
| **Raw record value** | `{!!Email!!}` | The same value as plain text with no formatting, for example `john@example.com`. |
| **Part of a raw value** | `{!!Address.city!!}` | One part of a field made of several parts (see the next section). |
| **Logged-in user field** | `{loggedInUser.Name}` | A field of the logged-in user's record in the Users table. |
| **App variable** | `{!currentDate!}` | The value of an [app variable](https://tadabase.com/docs/settings/app-variables). |
Placeholders use the field's name in the editor. When you save, Tadabase stores the field itself, so renaming the field later does not break the placeholder.
### Record values
**Add Field** only appears when the HTML component is on a page that shows one record, such as a details or edit page. It lists the fields of that page's table and inserts the formatted placeholder, for example `{Job Status}`. To use the raw value instead, change the brackets to `{!!Job Status!!}`.
Use raw values where formatting would get in the way, for example inside a link: `Email the customer`.
### Parts of names, addresses, files and images
Some fields hold several parts. Add a dot and the part's key inside a raw placeholder to show one part. `{!!Address!!}` on its own shows all the parts, separated by commas.
| Field type | Placeholders |
| --- | --- |
| **Name** | `{!!Name.title!!}`, `{!!Name.first_name!!}`, `{!!Name.middle_name!!}`, `{!!Name.last_name!!}` |
| **Address** | `{!!Address.address!!}`, `{!!Address.address2!!}`, `{!!Address.city!!}`, `{!!Address.state!!}`, `{!!Address.zip!!}`, `{!!Address.country!!}`, `{!!Address.lat!!}`, `{!!Address.lng!!}` |
| **File** | `{!!File.url!!}` (the file's address), `{!!File.name!!}` (its file name) |
| **Image** | `{!!Image.src!!}` (the picture's address), `{!!Image.name!!}` (its file name) |
| **Files** (several files) | `{!!Files.url!!}` and `{!!Files.name!!}` for the first file; `{!!Files.urls!!}` and `{!!Files.names!!}` for all files, separated by commas |
Replace `Name`, `Address` and so on with your field's name, for example `{!!Client Address.zip!!}`.
To show one particular file of a **Files** field, use the field's slug (such as `field_36`) and the file's position, counting from 0: `{!!field_36.0.url!!}` and `{!!field_36.0.name!!}` for the first file, `{!!field_36.1.url!!}` for the second. These only work with the slug, not the field's name.
### Logged-in user fields
**Add Logged-in Field** lists the fields of your Users table and inserts a placeholder such as `{loggedInUser.Email}`. For a **Name** or **Address** field, the list also offers each part (shown indented under the field), which inserts a placeholder such as `{loggedInUser.Address.city}`.
Logged-in fields work on any page. When nobody is logged in, or the user may not see that field, the placeholder shows nothing.
### App variables
**Add App Variable** lists your app's variables and inserts a placeholder such as `{!companyName!}`. Every app has these to start with:
| Variable | Placeholder |
| --- | --- |
| Logged in User Name | `{!loggedInUserFullName!}` |
| Logged in User Created | `{!loggedInUserCreatedDate!}` |
| Logged in User Roles | `{!loggedInUserRoles!}` |
| Current Date | `{!currentDate!}` |
| Current Time | `{!currentTime!}` |
To add your own, see [App variables](https://tadabase.com/docs/settings/app-variables). Values are worked out when the page loads; reload the page to see a changed value.
### Values from pipes
When your app has pipes, the window also has a **Pipes** tab. Click **Add New Pipe**, choose the pipe and set its values. Back on **General**, a **(Pipe) Fields** button for that pipe inserts any of its response values. See [Using pipes](https://tadabase.com/docs/pipes/using-pipes).
## On PDF pages
The HTML component is one of the few system components you can add to a PDF page. Record values, logged-in user fields and app variables work the same way there and are filled in when the PDF is made. The **Pipes** tab is not available on PDF pages. See [PDF pages](https://tadabase.com/docs/pages/pdf-pages).
## Change how it looks
The **Design** tab has **Fonts**, **Background**, **Border**, **Spacing** and **CSS** settings for the whole component. To remove the component, click **Delete** at the bottom left of the window.