
Add AI prompt buttons to tables, lists and details
Add an AI Prompts button to a Table, List or Details component, or an AI Prompt component, so people can run prompts on the records they see.
- Verified Nov 17, 2026
- Classic builder
- Tadabase AI
On this page
Add an AI Prompts dropdown button to a Table, List or Details component so the people using your app can run a prompt on the records they are looking at, for example "Summarize these jobs". The answer is shown in a panel under the button; it is not saved to a record.
You need at least one AI prompt in Automation > AI Prompts first. See Create an AI prompt.
Add the AI Prompts button to a component #
- Open the component In the Page Builder, open the page and edit the Table, List or Details component.
- Open the AI Prompts tab Click the AI Prompts tab in the component's settings.
- Add a prompt Click Setup New AI Prompt. A row is added with the first prompt in your app selected.
- Choose the prompt and name the item Under Choose AI Prompt, pick the prompt. Name fills in with the prompt's name; change it to the text people should see in the dropdown.
- Let people type a question (optional) Under Map Input, choose the prompt variable that should receive what the person types. Leave it on No Input to run the prompt with one click.
- Send the records (optional) Under Map Component Data, choose the prompt variable that should receive the records shown in this component. Leave it on No Component if the prompt does not need them.
- Choose the answer Under Response, choose the response to show. Only this one response is displayed.
- Style the button Button Title is the text on the dropdown button (default
AI Prompts). Button CSS Class is its style class (defaultbtn-ai-prompts). - Save Save the component.
Add one row per prompt. The trash button removes a row. To group items in the dropdown, click the + button (Add Group) on a row: a group row is inserted above it, and the text in its Name box is shown as a heading that cannot be clicked.
What the prompt receives #
| Setting | Value sent to the variable |
|---|---|
| Map Input | The text the person types in the Type your prompt here... box. |
| Map Component Data | The records currently shown in the component, as a JSON list. Each record uses the column or field labels as keys and the displayed text as values. Only what is on the screen is sent: the current page of results, after any filter or search, and only the columns the component shows. |
Variables you do not map use the Default Value set on the prompt's Dynamic Variables tab.
What people see in the app #
- The component shows a dropdown button with your Button Title.
- The person opens it and clicks a prompt name.
- If the prompt has a Map Input variable, a text box with the placeholder Type your prompt here... opens. The person types a question and presses Enter. Otherwise the prompt runs right away.
- While it runs, a spinner shows. The answer then appears in a panel under the button, with Copy and Close buttons. Copy copies the answer; Close hides the panel.
- For a prompt with a question box, the box stays open under the answer: the person can type another question and press Enter to run the prompt again.
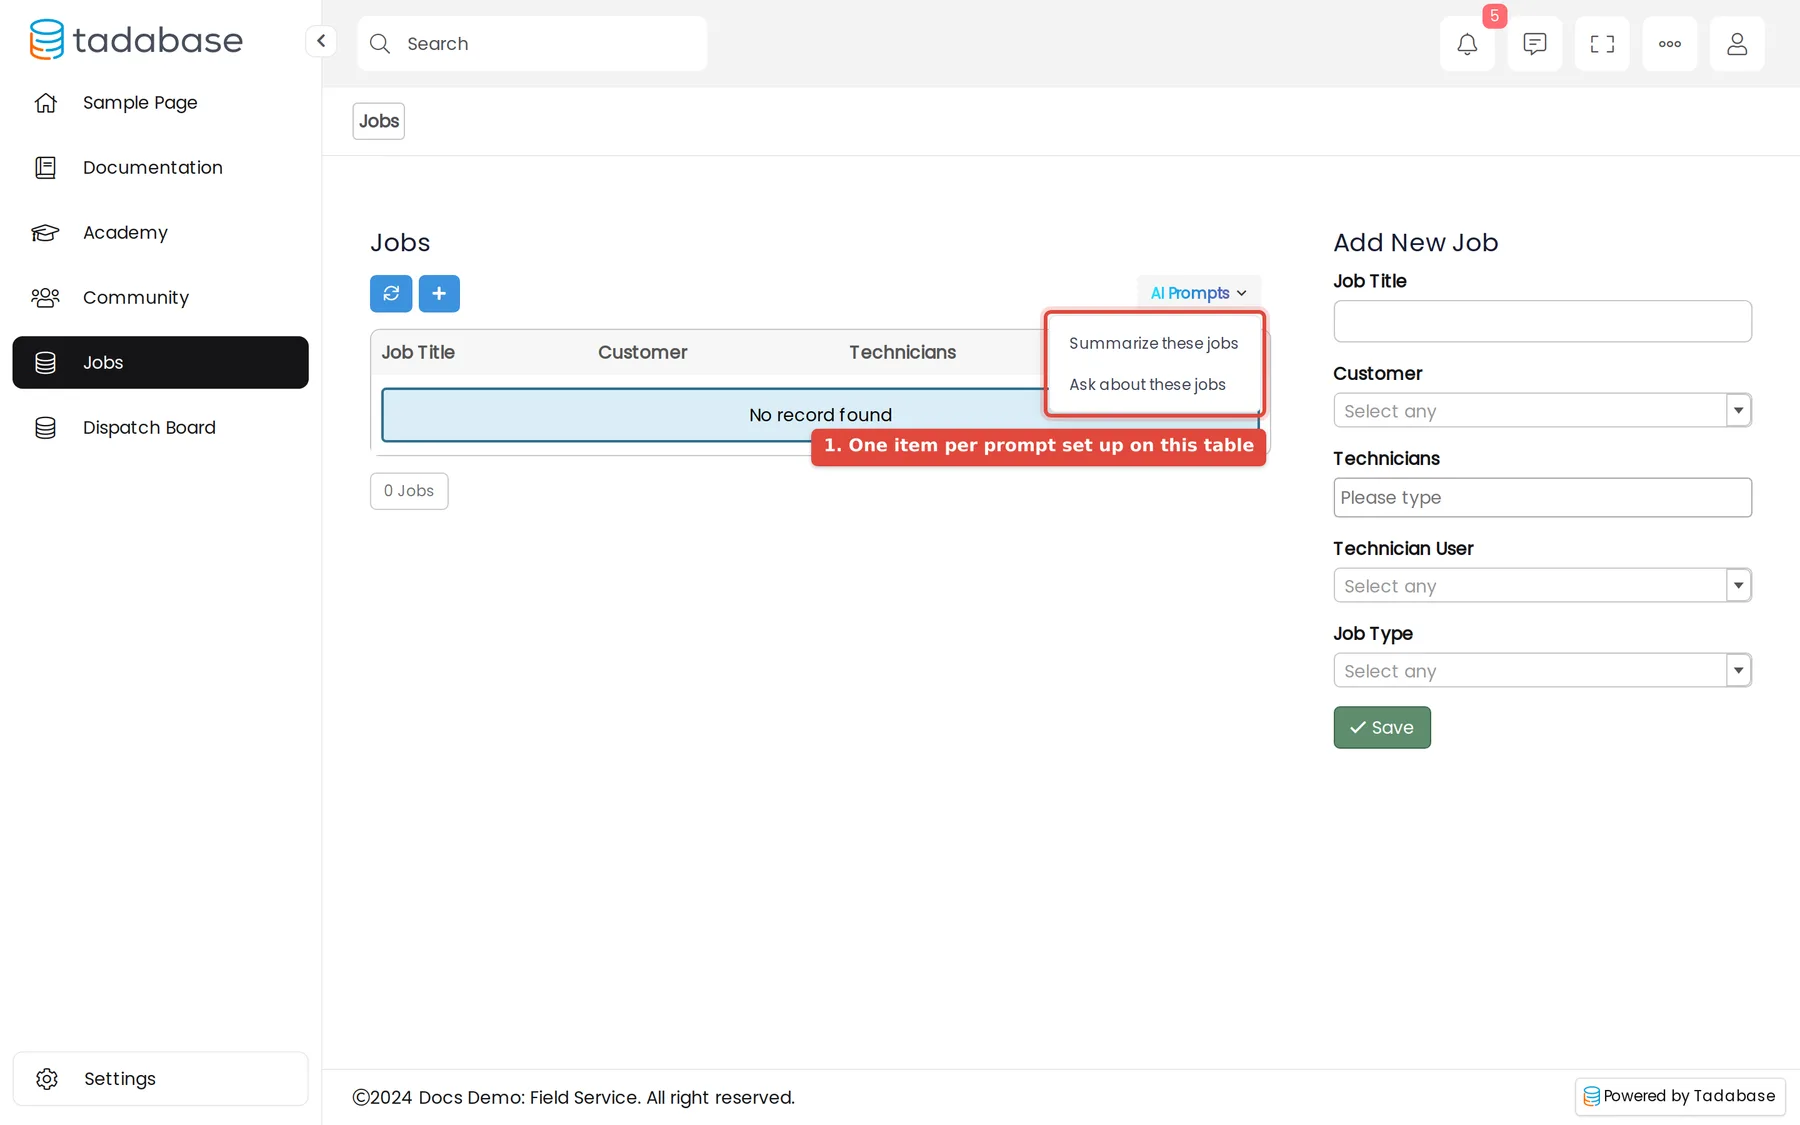
The answer is shown only to the person who ran it and is not saved. To store AI answers on records, run the prompt in a workflow instead. See Use an AI prompt in a workflow.
Add an AI Prompt component to a page #
The AI Prompt component is a standalone AI Prompts button. Use it when one prompt should read the records of several components on the same page, such as a table of open jobs and a list of technicians.
- Add the component In the Page Builder, drag AI Prompt from Data Components onto the page. It is listed only when your plan includes AI prompts.
- Set up the prompts The settings open on the AI Prompts tab. Click Setup New AI Prompt and fill in Choose AI Prompt, Name, Map Input and Response as for a table.
- Pick the components to read Under Map Component Data, click Set New. Choose a component in Select Component and the prompt variable that receives its records in Select Field. Repeat for each component. Only Table, List and Details components on the same page are listed.
- Name the button On the General tab, set Button Title and CSS Class.
- Save Click Update & Save.
In the app it works like the button on a table: a dropdown of prompt names, an optional question box, and a panel with the answer.
Plans and limits #
- AI prompts are a plan feature.
- Every run counts toward your account's daily AI token limit. Sending many records with Map Component Data uses more tokens; use filters or a smaller page size to send fewer.
- When the daily limit is used up, the prompt returns no answer until the next day. See How AI prompts work.
If it does not work #
| What you see | Check |
|---|---|
| No button on the component | At least one row on the AI Prompts tab has a prompt selected, and the component was saved. |
| The spinner stops but no panel opens | A Response is chosen, and the prompt returns a value for it. Test the prompt on its own in the Test Playground. Also check whether the daily token limit has been reached. |
| The answer does not mention the records | Map Component Data is set, and the prompt text uses that variable in curly brackets, for example {records}. |
Was this page helpful?
Something wrong or missing on this page? Tell us.