
Limit which records each user can see
Turn on row-level security for a table and add policies that decide which records, fields and actions each user or role gets.
- Verified Nov 17, 2026
- Classic builder
- Available on: Business Starter, Business Growth, Business Pro, Business Elite
On this page
Row-level security (RLS) limits which records of a table each user can read, create, update or delete, and can hide or mask individual fields. You set it once per table, and it applies to every page and component that shows that table, so a missed filter on one component cannot expose records.
When to use it #
- Customer portals: each customer sees only their own jobs, invoices or tickets.
- Shared apps with several companies or teams: each group sees only the records connected to it.
- Sensitive fields: most of a record can be shared, but a few fields (salary, ID numbers, internal notes) must be hidden or masked.
RLS works alongside the other ways of limiting what people see:
| Setting | What it controls | Scope |
|---|---|---|
| Row-level security | Which records and fields a user gets from a table, and what they may do with them | Every page and component that uses the table |
| Page and layout Security | Who can open a page | One page, or every page in a layout |
| Component data source filters (such as Records connected to the logged in user) | Which records one component shows | One component; it can only narrow what RLS allows |
| Filters people choose in the live app | What a user narrows their own view to | The user can change them; they never widen what RLS allows |
Before you start #
- RLS is included on the Business Starter, Business Growth, Business Pro and Business Elite plans. On other plans the table's Security tab is not shown.
- Create your roles first if your policies will target roles.
- To limit records to "their own", the table needs a connection field to the Users table (for example, a Jobs table with a field for the assigned technician).
Turn on RLS for a table #
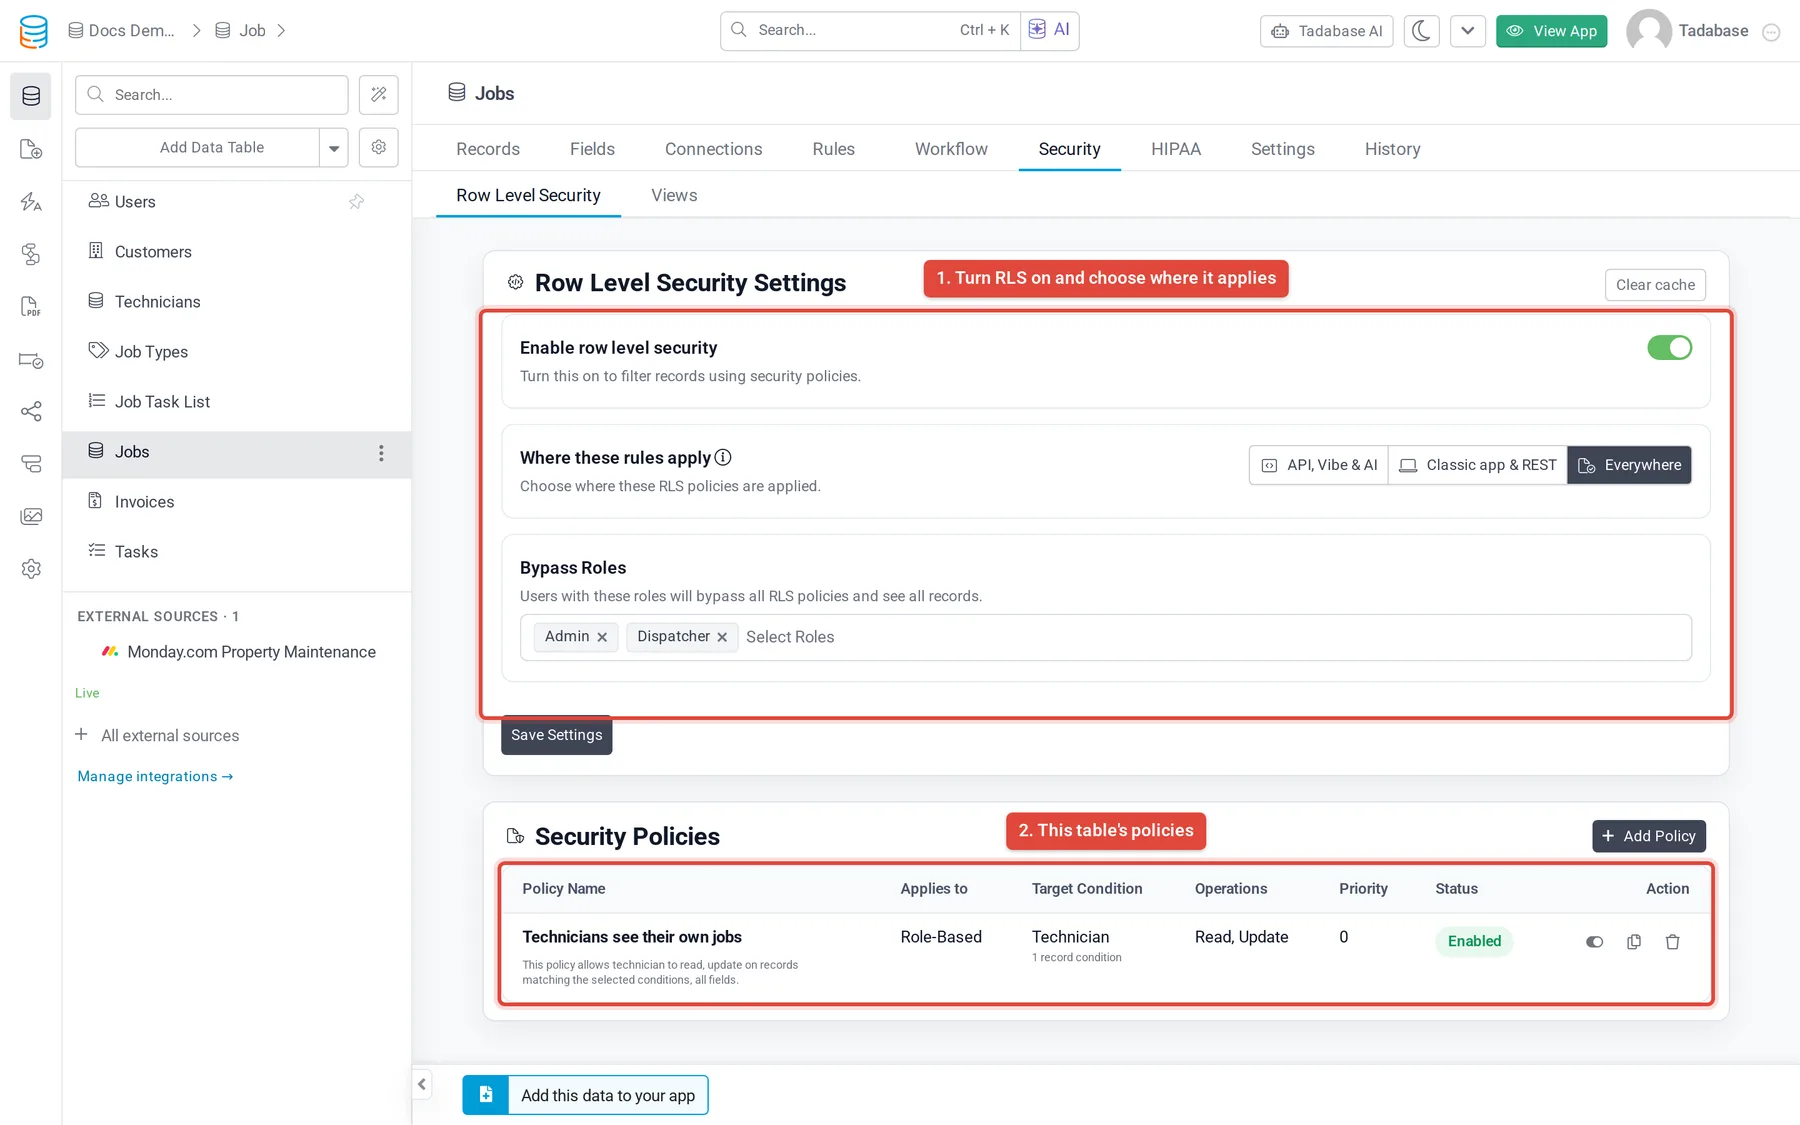
- Open the table's Security tab In the Data Builder, open the table and click the Security tab. The Row Level Security sub-tab opens.
- Switch it on Under Row Level Security Settings, turn on Enable row level security.
- Choose where the rules apply Under Where these rules apply, choose Classic app & REST or Everywhere so your classic app pages are filtered (see the table below).
- Pick bypass roles (optional) Under Bypass Roles, choose roles whose users skip every policy on this table and see all records, such as Admin. This setting only appears once your app has roles.
- Save Click Save Settings. The Security Policies list appears below.
| Where these rules apply | What is filtered |
|---|---|
| API, Vibe & AI (the default) | API, Vibe app and AI (MCP) requests. Classic app pages and the REST API ignore these rules. |
| Classic app & REST | Classic app pages, and REST API calls made with a user token, as that user. |
| Everywhere | Both of the above. |
Add a policy #
A policy says which users it is for, what they may do, and on which records. Click Add Policy to open the policy editor, then work through its steps with Next.
- Who can use this access? Choose Specific Users (users matching conditions you set on the Users table), Any Logged in Users, Anyone (Public) (visitors who are not logged in) or Specific Roles (then pick them under Target Roles).
- Which operations are allowed? Choose Read, Create, Update and Delete in any combination, or Full permission for all four.
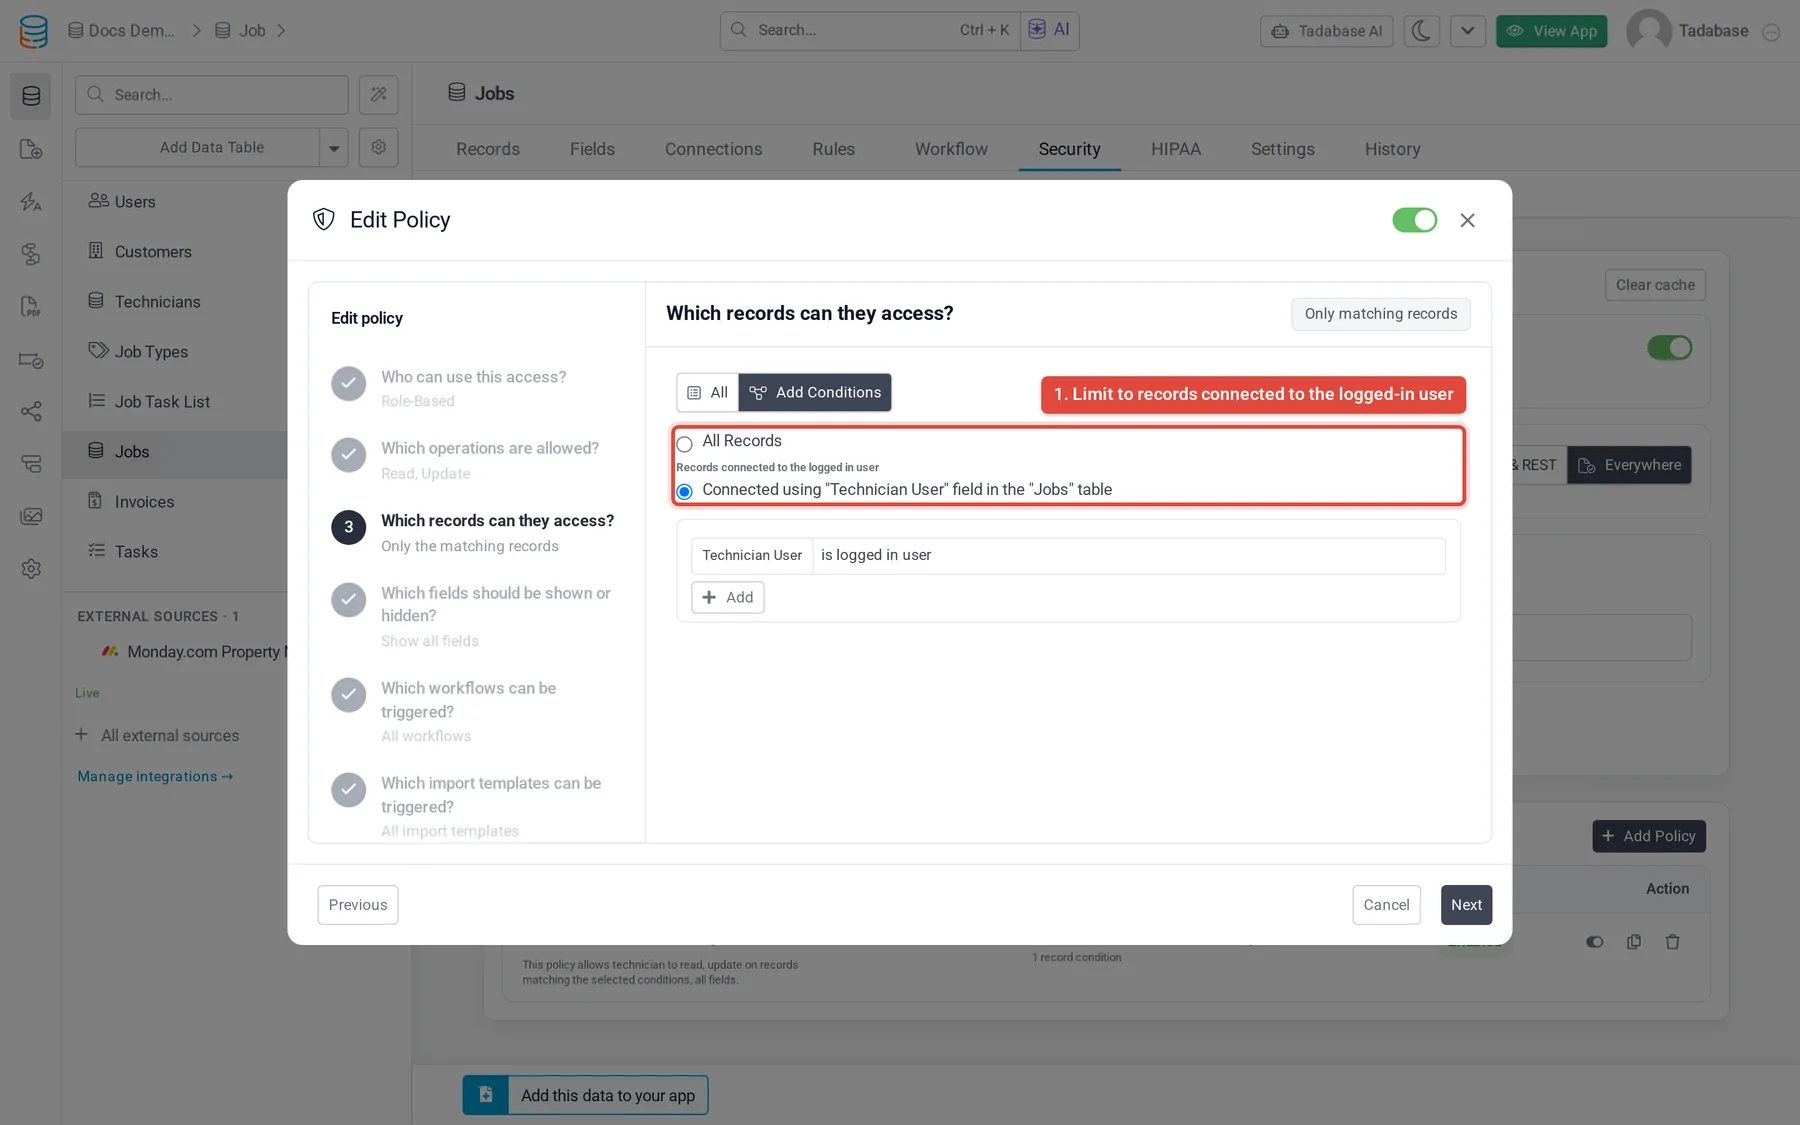
- Which records can they access? Choose All, or Add Conditions and build a filter. When the table connects to the Users table, shortcuts appear: All Records and one Connected using "<field>" field option per connection, which limits the policy to records connected to the logged-in user. Quick templates such as Matches logged in user and Matches any logged in user role fill in a starting condition.
- Which fields should be shown or hidden? Keep All Fields, or choose Restrict the following (hide the fields you pick) or Only allow the following (show only the fields you pick). Then choose how hidden values look: Starred, Circle, Blurred or Blank, and pick the fields.
- Workflows, import templates and export templates Steps 5 to 7 let you block, or allow only, chosen workflows, import templates and export templates for these users. Leave them on All Workflows, All Import Templates and All Export Templates unless you need them; they are checked when these are started through the API, Vibe apps or AI, not from classic app pages.
- Policy Details Enter a Policy Name (required), an optional Description and a Priority. Check the plain-English summary under Policy Description, then click Create Policy.
In the policy list, each policy shows who it applies to, its conditions, operations, priority and status. Use the row buttons to disable, duplicate or delete a policy, and click a row to edit it.
Example: technicians see only their own jobs #
In a field service app, the Jobs table has a connection field to the Users table for the assigned technician. Turn on RLS for Jobs with Everywhere, add Admin and Dispatcher as bypass roles, then add one policy:
- Who can use this access? Specific Roles, target role Technician.
- Which operations are allowed? Read and Update.
- Which records can they access? The Connected using "<field>" field shortcut for the technician field.
- Policy Name: Technicians see their own jobs.
Technicians now see and edit only the jobs assigned to them, on every page. Customers, who match no policy, get no jobs from this table until you add a policy for them.
How several policies combine #
- Only the matching policies with the highest Priority count. A matching policy with a lower priority is ignored, so a higher-priority policy can override a broader one.
- Matching policies that share the top priority add together: the user gets every record any of them allows.
- A field chosen under Restrict the following stays hidden even if another matching policy would show it.
- Disabled policies are ignored. If you turn RLS off for the table, its policies are kept but not applied until you turn it back on.
Check that it works #
- Open the overview Hover over the Data Builder icon in the left menu and choose Row Level Security Overview. It lists every table with RLS on or off, field-level security (FLS) on or off, and its policy counts. Manage opens a table's Security tab.
- View as a user Click View Permissions As, then pick Public (Unauthenticated) or search for a user. You see, for each table, whether they can read, create, update and delete, how many records they get, how many fields are hidden, and which policies matched.
- Check the log Each time RLS blocks someone, it is recorded in RLS Logs in your app's logs, with the table, record ID, operation, reason, user and IP. Look there when a user reports they cannot see something.
What RLS does not filter #
- The builder: you always see every record while building.
- Workflows, including workflows that run on a schedule.
- REST API calls made with only the app's API key and secret. These act as the app owner and are never filtered. REST API calls made with a user token are filtered as that user when the table is set to Classic app & REST or Everywhere.
Was this page helpful?
Something wrong or missing on this page? Tell us.