
Let users log in with Microsoft Azure (Entra ID)
Register an app in Microsoft Entra ID (Azure AD), add Tadabase's callback URL and permissions, and paste the tenant, client ID and secret into your app.
- Verified Nov 17, 2026
- Classic builder
On this page
Let your app's users sign in with their work or school Microsoft account. Microsoft now calls Azure Active Directory Microsoft Entra ID; in Tadabase the provider is still labelled Azure.
1. Turn on Azure and copy the callback URL #
- Open User Settings In the builder, open Settings > User Settings, General tab.
- Turn on Azure Under Login/Signup Methods, click the Azure icon. The Azure card opens.
- Copy the callback URL Click Copy next to Callback URL.
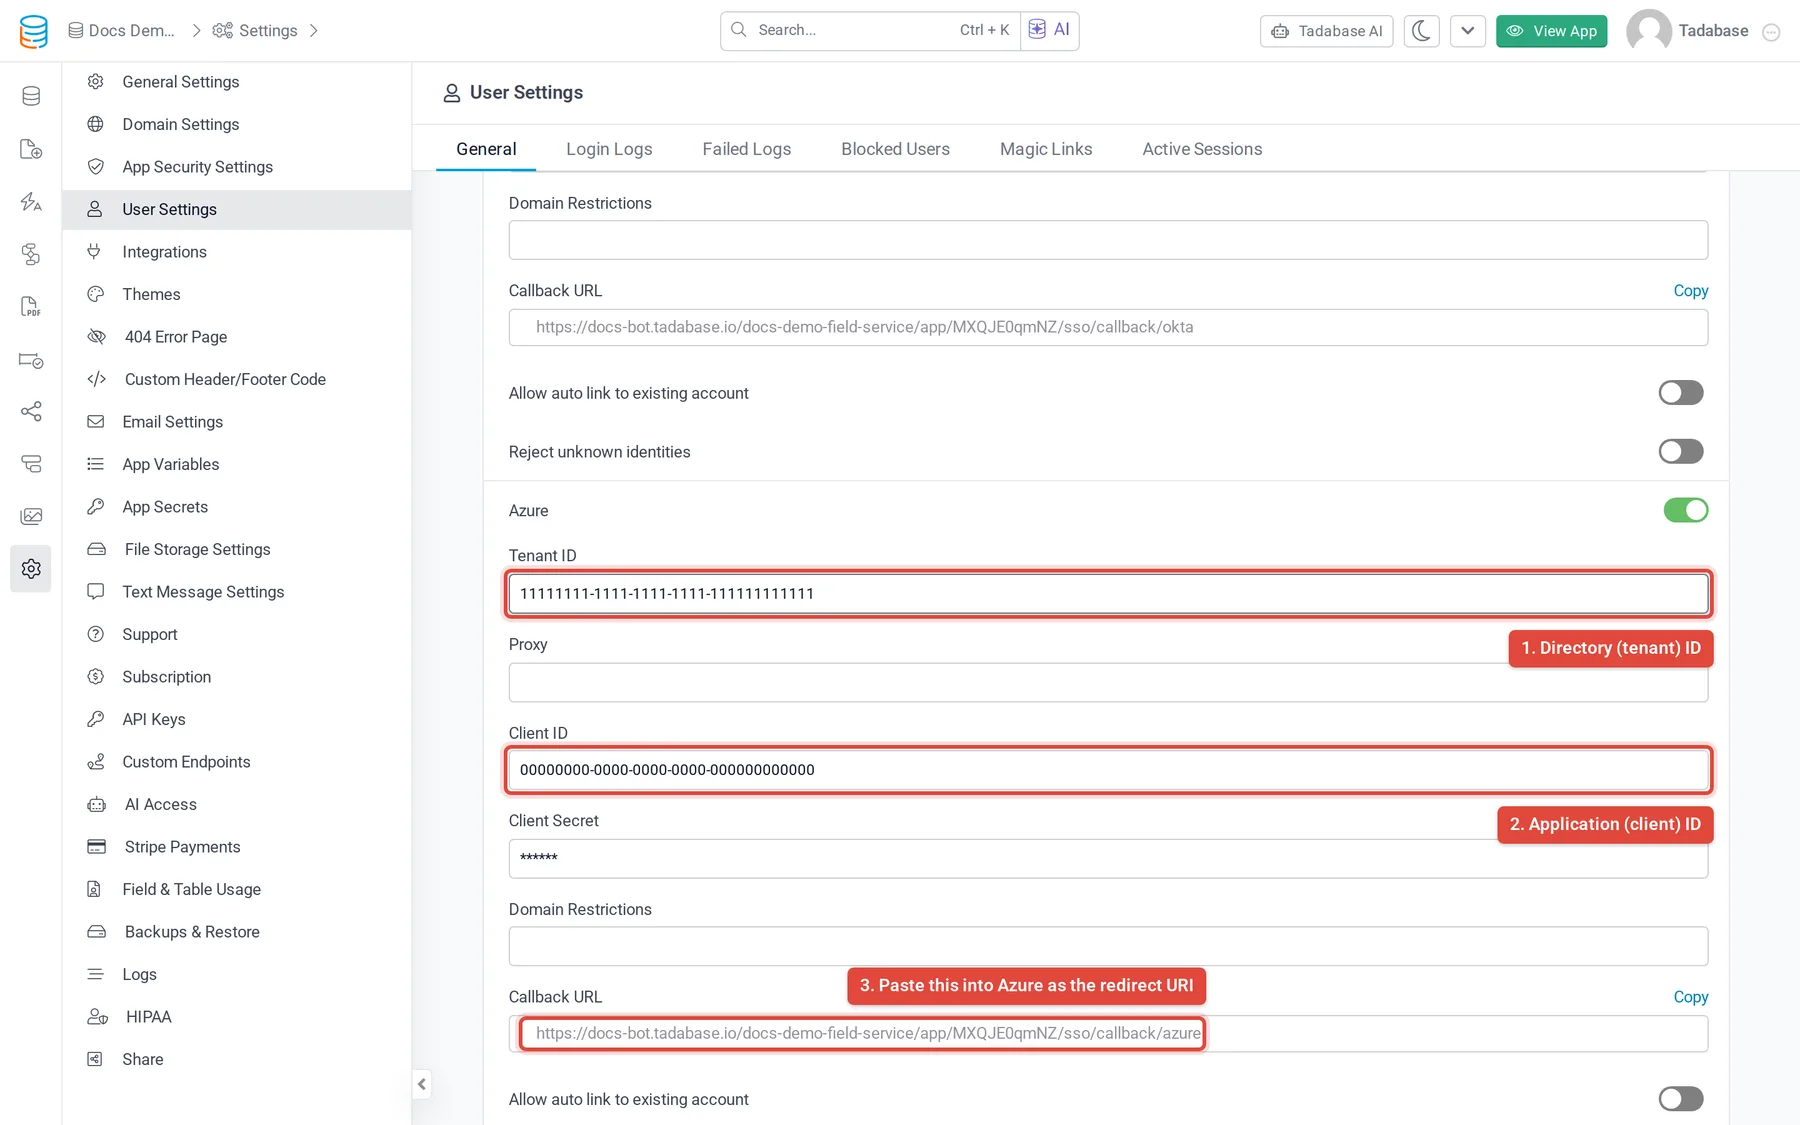
2. Register an app in Microsoft Entra ID #
- Start a new registration In the Azure portal (or the Microsoft Entra admin center), open App registrations and create a new registration.
- Choose the account type Choose accounts in your organizational directory only (single tenant) if only your organization will sign in. Choose accounts in any organizational directory (multitenant) to accept other organizations' work accounts. Personal Microsoft accounts cannot sign in to Tadabase apps.
- Add the redirect URI Under redirect URI, choose the Web platform and paste the Callback URL you copied from Tadabase. You can also add it later under the app's Authentication settings.
- Note the IDs After you register, copy the Application (client) ID and the Directory (tenant) ID from the app's overview.
3. Add API permissions #
Under API permissions, add Microsoft Graph delegated permissions openid, profile and email. Tadabase also requests User.Read, which new registrations include by default. If your directory requires admin consent, grant it for your organization.
4. Create a client secret #
- Add a client secret Under Certificates & secrets, add a new client secret and choose when it expires.
- Copy the Value Copy the secret's Value, not its Secret ID. Microsoft shows the value only once.
5. Fill in the Azure card #
| Field | What to enter |
|---|---|
| Tenant ID | The Directory (tenant) ID, or a verified domain of your directory. Only accounts from this directory can sign in. If you leave it empty, any organization's work or school account can sign in. |
| Proxy | Leave empty unless your network team gives you an outbound proxy address for Tadabase to reach Microsoft through. |
| Client ID | The Application (client) ID. |
| Client Secret | The client secret's Value. |
| Domain Restrictions | Optional. A comma-separated list of email domains that may sign in. |
| Allow auto link to existing account | Links a first Azure sign-in to an existing user with the same email. |
| Match accounts on | Which directory attribute is the user's email in your app: Email address (mail attribute, UPN as fallback) or User principal name (UPN, mail as fallback). Entra ID often keeps these different. |
| Reject unknown identities | Reject refuses directory users who have no user in your app; Allow sign-up lets them register. |
Save your changes. With Azure on, you can also turn on Single sign-on only to stop password sign-in for everyone except your break-glass administrators: see Options on every provider card.
6. Add the Azure buttons #
Add Login With Azure (SSO) to your Login component and Signup With Azure (SSO) to your Signup component, then test in a private browser window. See Set up a provider.
If a user from another directory tries to sign in while Tenant ID is set, they see "This account belongs to a directory that is not allowed to sign in here."
Was this page helpful?
Something wrong or missing on this page? Tell us.