
Create a custom pipe
Build your own pipe for any HTTP API: add calls with a method and URL, parameters, authorization, headers and a body, test them, and map the response.
- Verified Nov 17, 2026
- Classic builder
On this page
When no library pipe fits, build your own. A custom pipe can call any service that has an HTTP API: you enter the requests from the service's API documentation, test them in the builder, and pick which parts of the response your app can use.
Create the pipe #
- Add a new pipe Click Pipes in the builder's icon bar, then click Add New Pipe at the top of the All Pipes list. A pipe named New Pipe 1 (or the next number) is created and its editor opens.
- Name it On the General tab, enter a Name and Description, then click Save. The name is what you pick from when you add the pipe to a page or workflow.
- Turn on debugging while you build (optional) Check Enable Debug Mode to log the pipe's response in the browser console of the live app each time the pipe runs. Turn it off when you are done.
Add values every call shares #
Put values that all calls use, such as an API key or an account ID, on the pipe's global tabs instead of repeating them in each call.
- Global Parameters: click Add New Parameter. Give it a Name, a Type (Text, Date/Time or JSON), a Default Value, a Visibility (Public or Private), whether it is Required, and optional Help Text (HTML allowed).
- Global Headers: click Add New Header and enter each header as a Key and Value, for example
Acceptandapplication/json. Global headers are sent with every call.
Click Save on each tab.
Add an API call #
Open the API Calls tab and click Add New Call. Calls are listed on the left; click one to edit it. Rename a call or add a description by clicking its title, and use the buttons beside it to Move To Group, Copy or Delete it. Each call has these tabs:
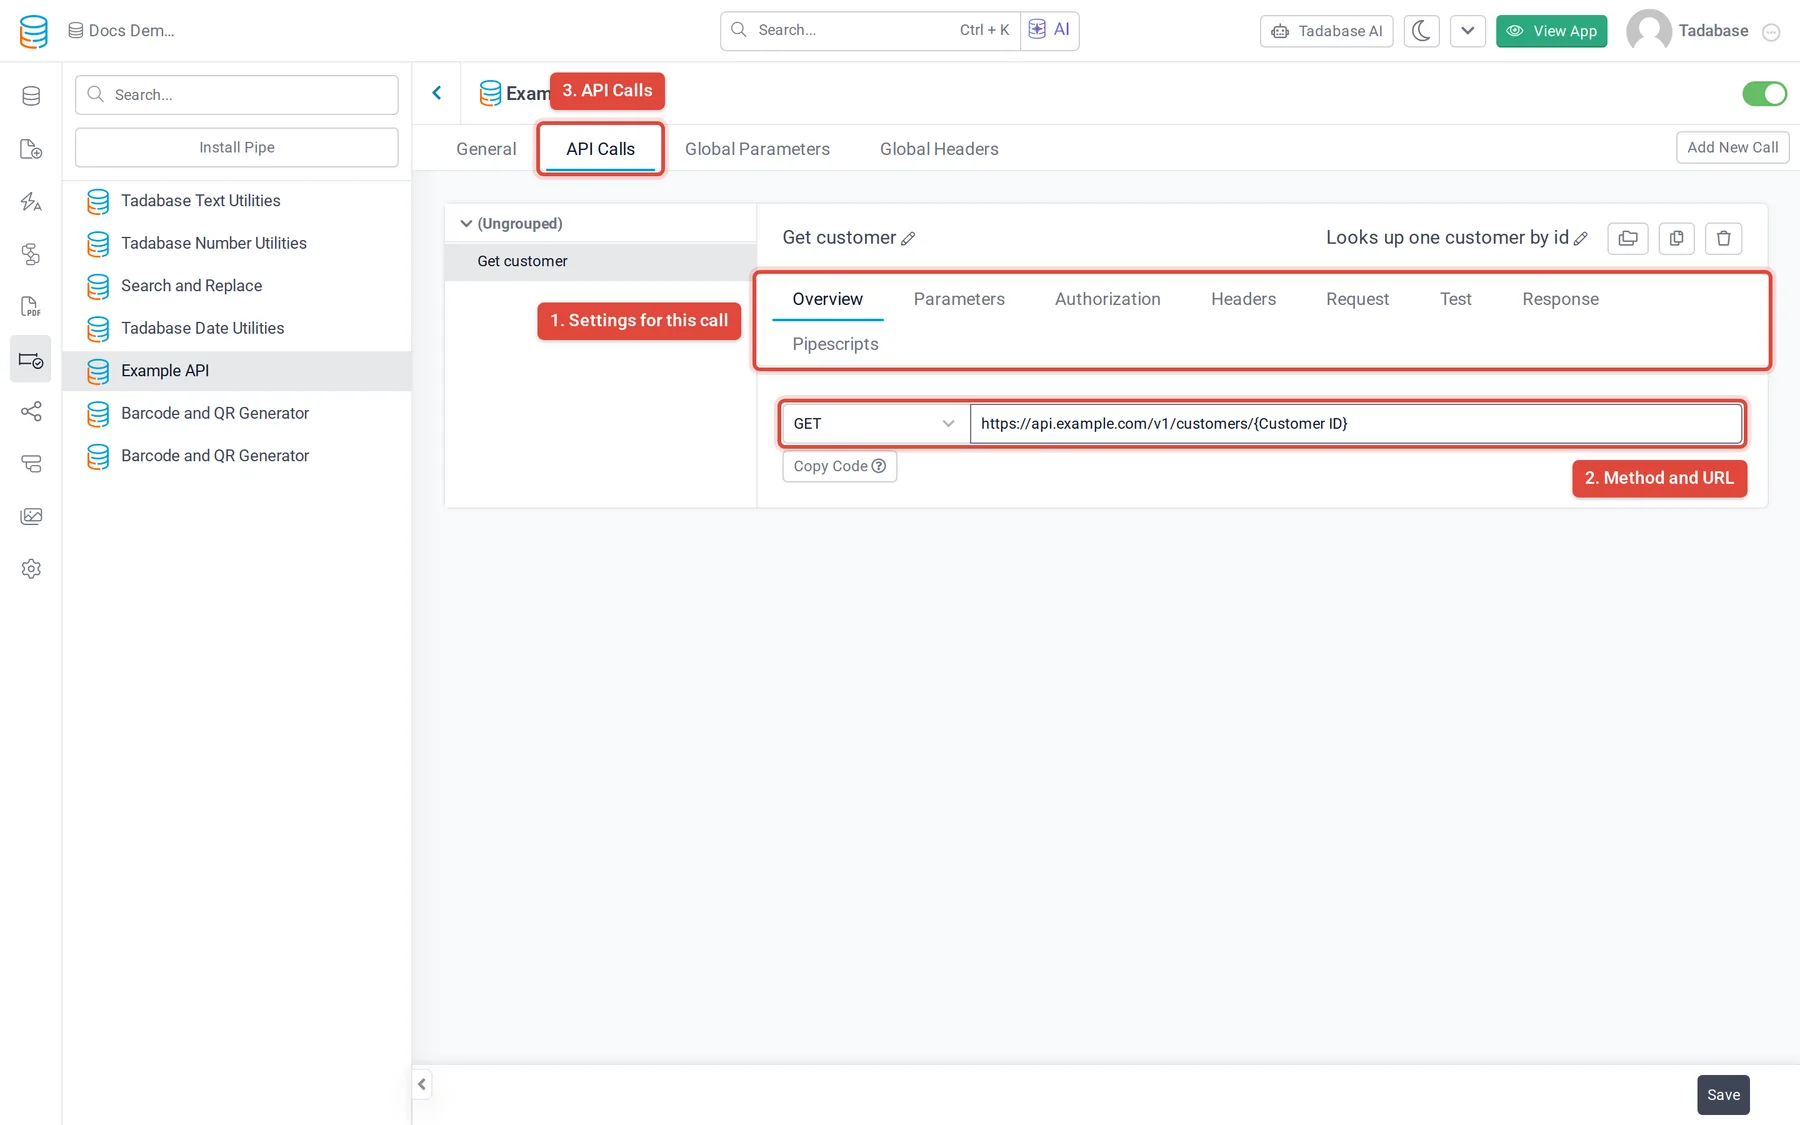
| Tab | What you set |
|---|---|
| Overview | The method (GET, POST, PUT, DELETE or PATCH) and the URL. Put a parameter in the URL with curly braces, for example https://api.example.com/. |
| Parameters | Values the call needs from your app. Click Add New Parameter and set the Name, Type (Text, Logged In User Value, Date/ |
| Authorization | No Authorization, API Key (a Key and Value, added to the Header or Query Params), Bearer Token (a Token) or Basic Authorization (a Username and Password). This applies to this call only. |
| Headers | Headers for this call only. Click Add New Header and enter a Key and Value, or click Bulk Edit and paste one Key: Value per line. |
| Request | The body. Request Type Form Data sends key and value pairs (click Add New Request for each). RAW Data sends the text you type; set Content Type to JSON for a JSON body. Use Add Parameter to insert a parameter at the cursor. |
| Test | Fill the parameter values and click Test to send the request. See below. |
| Response | The values your app can use from the response. See below. |
Wherever you can type a value (URL, header values, request body), refer to a parameter by its name in curly braces, such as {API Key} or {Customer ID}. Parameters from the Global Parameters tab work the same way.
Click Save at the bottom of the tab when you change a call.
Test the call and map the response #
- Send a test request Open the call's Test tab, fill in values for its parameters (required ones are marked with
*), and click Test. The response appears below with its Status code; switch between Body and Raw to see it formatted or as plain text. - Populate the responses Click Populate Responses. A window lists every key in the response. Check the keys you want, give each a Field Name (the name you will pick in your app), and click Populate. Leave Overwrite Saved Responses checked to replace the call's existing mappings, or clear it to add to them.
- Check the Response tab Open the Response tab. Each row has the Key to read (as JSON or RAW), the Field Name and a Data Type: String, JSON, Comma Separated Values or Number. The data type decides which conditions are offered for the value in the page builder. Click Add New Response to add a mapping by hand.
To read a nested value, join the keys with a dot. To read an item in a list, use its position, starting at 0. For this response:
{
  "main": { "temp": 63.99, "humidity": 82 },
  "weather": [ { "main": "Clear", "description": "clear sky" } ]
}main.tempreturns63.99.weather.0.descriptionreturnsclear sky.- If the whole response is a list, start with the position:
0.idis theidof the first item.
Group calls #
A pipe with many calls can sort them into groups. Select a call and click Move To Group to put it in a group. Use the buttons on a group to Rename Group or Delete Group. Calls not in a group are listed under (Ungrouped).
Run a call from your own JavaScript #
If your plan includes JavaScript in pipes, each call in a custom pipe has a Pipescripts tab, and the Overview tab shows a Copy Code button. Click Copy Code to copy a snippet that runs this call with TB.triggerPipe(...) and logs the response; paste it into your app's JavaScript and replace the example parameter values. On the Pipescripts tab, Logged in User Conditions limit which logged-in users can run the call this way. Without the plan permission, the tab shows Not Allowed.
If a call does not work #
- Compare the Status on the Test tab with the service's API documentation. A 401 or 403 usually means the API key, token or authorization type is wrong; a 404 usually means the URL or a parameter in it is wrong.
- Check that every
{Name}in the URL, headers and body matches a parameter name exactly. - If the call works in the builder but not in your app, turn on Enable Debug Mode on the General tab, run the pipe in the live app and read the response in the browser console.
- If no values come back in your app, check the Response tab: only mapped keys are available.
Was this page helpful?
Something wrong or missing on this page? Tell us.