
Connect Shopify with the Shopify pipe
Install the Shopify pipe with an Admin API access token and your shop slug, then read and change products, orders, customers and inventory.
- Verified Nov 17, 2026
- Classic builder
On this page
The Shopify pipe calls the Shopify Admin REST API from your app. Use it to look up and create products, orders and customers, and to change inventory levels, for example from a workflow when a record is saved.
Before you start #
- A Shopify store and its shop slug: the part before
.myshopify.comin your store's admin address. Forpipes-8039.myshopify.comthe slug ispipes-8039. - An Admin API access token (it starts with
shpat_) from a custom app in your store, with access to the resources you plan to use: products, orders, customers, inventory and locations.
Install the pipe #
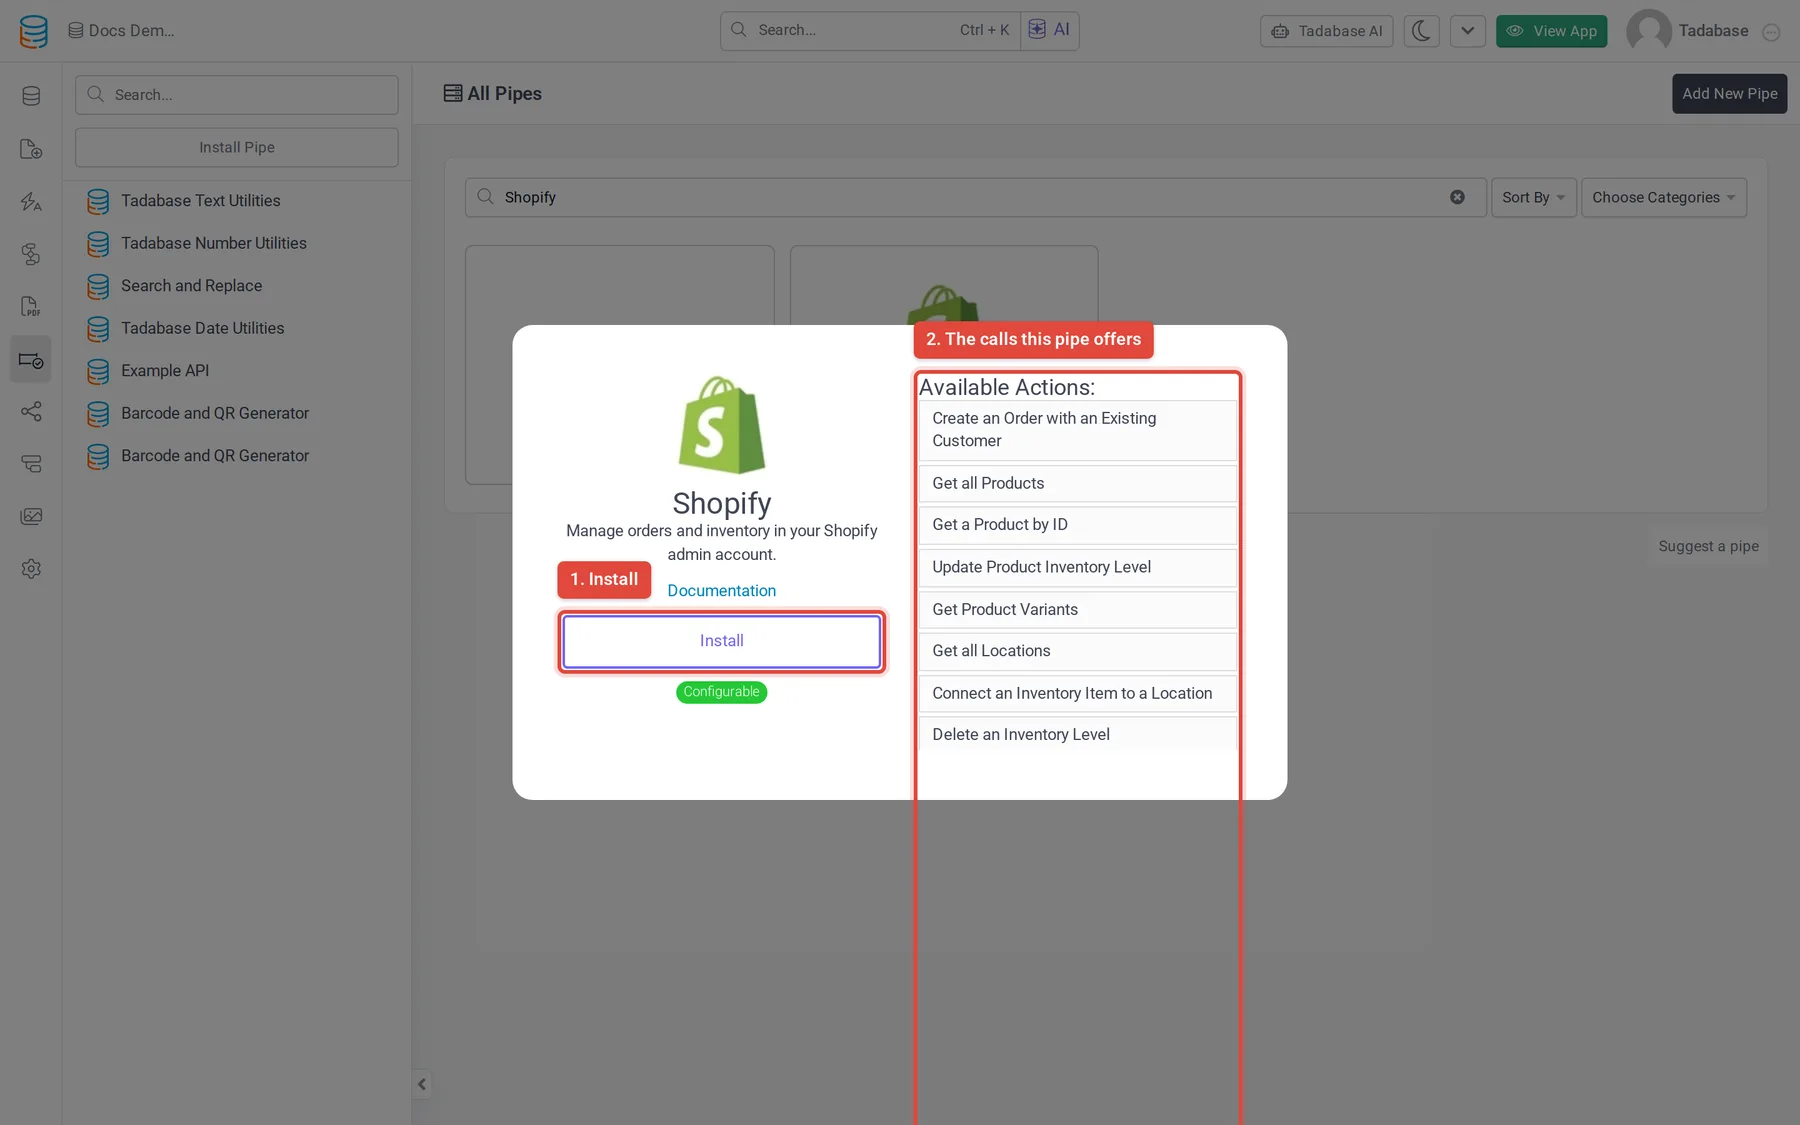
- Open Pipes In the builder, click the Pipes icon in the left menu. The All Pipes page lists every pipe you can install.
- Find the pipe Type
Shopifyin the Search... box and click the Shopify card. The window shows what the pipe does and its Available Actions: the calls it offers. - Click Install Click Install. If your plan does not include pipes, an upgrade button shows instead.
- Enter your credentials Enter your access token in API Key and your shop slug in Shop Slug. Both are required. Click Install.
Set the API version #
The pipe puts the value of the API Version global parameter into every call's address (/admin/api/{apiVersion}/). It is not asked for during install and starts as 2022-01.
Shopify publishes a new API version every quarter and supports each one for at least 12 months. 2022-01 was retired long ago: Shopify answers requests for a retired version with its oldest supported version, so the behavior of your calls can change every quarter without warning. Set a version Shopify currently supports instead.
- Open the installed pipe Open the Shopify pipe from your installed pipes and click the Global Parameters tab.
- Change API Version Replace the value of API Version with a supported version in
YYYY-MMform. Shopify lists the supported versions in its API versioning guide. - Save Click Save.
Calls in the pipe #
The Shopify pipe is Configurable: you can open each call and change its address, parameters and request body. As installed, it offers these calls.
| Resource | Call | Parameters |
|---|---|---|
| Products | Get all Products | None |
| Products | Get a Product by ID | Product ID, Fields (optional, comma-separated, for example id,title,images) |
| Products | Get Product Variants | Product ID |
| Products | Create a Product | Product Title, Body HTML, Product Type, Tag, Vendor |
| Products | Update a Product | Product ID, Product Title, Body HTML, Product Type, Product Tags, Vendor |
| Orders | Get all Orders | None |
| Orders | Get an Order by ID | Order ID |
| Orders | Create an Order with an Existing Customer | Product Variant ID, Quantity, Customer ID, Order Payment Status, Customer Email, Send Fulfillment Receipt |
| Orders | Create an Order with a New Customer | Product Variant ID, Quantity, Order Payment Status, Customer Email, Send Fulfillment Receipt, First Name, Last Name, Street Address, City, State/ |
| Orders | Cancel an Order | Order ID |
| Orders | Delete an Order | Order ID |
| Customers | Get all Customers | None |
| Customers | Create a Customer | Customer Email, First Name, Last Name, Phone, Street Address, City, State/ |
| Inventory | Get all Locations | None |
| Inventory | Get all Inventory Levels | Location ID |
| Inventory | Update Product Inventory Level | Inventory Item ID, Adjustment (negative to subtract), Location ID |
| Inventory | Connect an Inventory Item to a Location | Inventory Item ID, Location ID |
| Inventory | Delete an Inventory Level | Inventory Item ID, Location ID |
Order Payment Status accepts pending, authorized, partially_paid, paid, partially_refunded, refunded or voided, and starts as pending.
Use it in a workflow #
You can run any call of an installed pipe from a workflow with the Trigger Pipe action, and use what it returns in later steps. Pipes can also run in other parts of your app, as described in Using pipes.
Example: when a record is added to a Products table in your app, create the product in Shopify and keep its Shopify ID.
- Add a Shopify ID field In your Products table, add a text field named Shopify ID.
- Start a workflow Create a workflow that runs when a record is created in the Products table.
- Add a Trigger Pipe step Add the Trigger Pipe action. In Pipe Method, choose the Shopify pipe's Create a Product call. Under Parameters, set Product Title, Vendor and the other values from the record's fields.
- Save the ID Add an Update Record step after it and set the Shopify ID field to the pipe's Product ID response.
More from Shopify #
For every field these calls accept and return, see Shopify's REST Admin API reference.
Was this page helpful?
Something wrong or missing on this page? Tell us.