
Show a message to the person using the app
Use the Show Message action to show a toast, banner, dialog or full-page lock while a workflow runs, and to ask a question whose answer later steps use.
- Verified Nov 17, 2026
- Classic builder
On this page
The Show Message action shows a message in the app while a workflow runs: a short toast, a banner, a dialog, a full-page lock, or a question with answer buttons. Use it to tell people that something worked, to warn them, or to ask them to choose before the workflow carries on.
When a message can show #
A message needs someone with the app open in a browser. Show Message is offered only for triggers that someone using the app starts: Record Created, Record Update, Record Created or Edited, Manual, Component and User Event. With a record or User Event trigger, the panel reminds you: Only shown when someone using the app started this run.
Triggers that run in the background, such as Schedule, Incoming Webhook, Email Catcher, External Data Source and Called from an App, do not offer the action. If a workflow already has a Show Message step and runs in the background, for example after you change its trigger, when another workflow starts it, or when a run is started again from the history, the step succeeds without showing anything. The run history says why, for example Not shown: background run (schedule) — nobody is watching.
Add a message #
- Add the action In the workflow editor, click Add Step, then Add Action. Under User Experience, choose Show Message.
- Pick a style Under Style, click one of the tiles. Each style is described in the table below.
- Write the message Under Message, type a Title. Every message needs a title. For the Tray style you can add a Description; the other styles have a Text box with bold, italic, underline, lists and links. Click Insert Field to add a value from the record or an earlier step, such as the customer's name.
- Add buttons (optional) Under Buttons, click Add Button. Give each button a label, a look (Primary, Secondary or Link) and what happens under Then.
- Choose who sees it Open Who sees it. The default is Person who started it.
- Check it For any style except Tray, click Preview in the Style header to see the message with sample values. Save the workflow, then start it from the app.
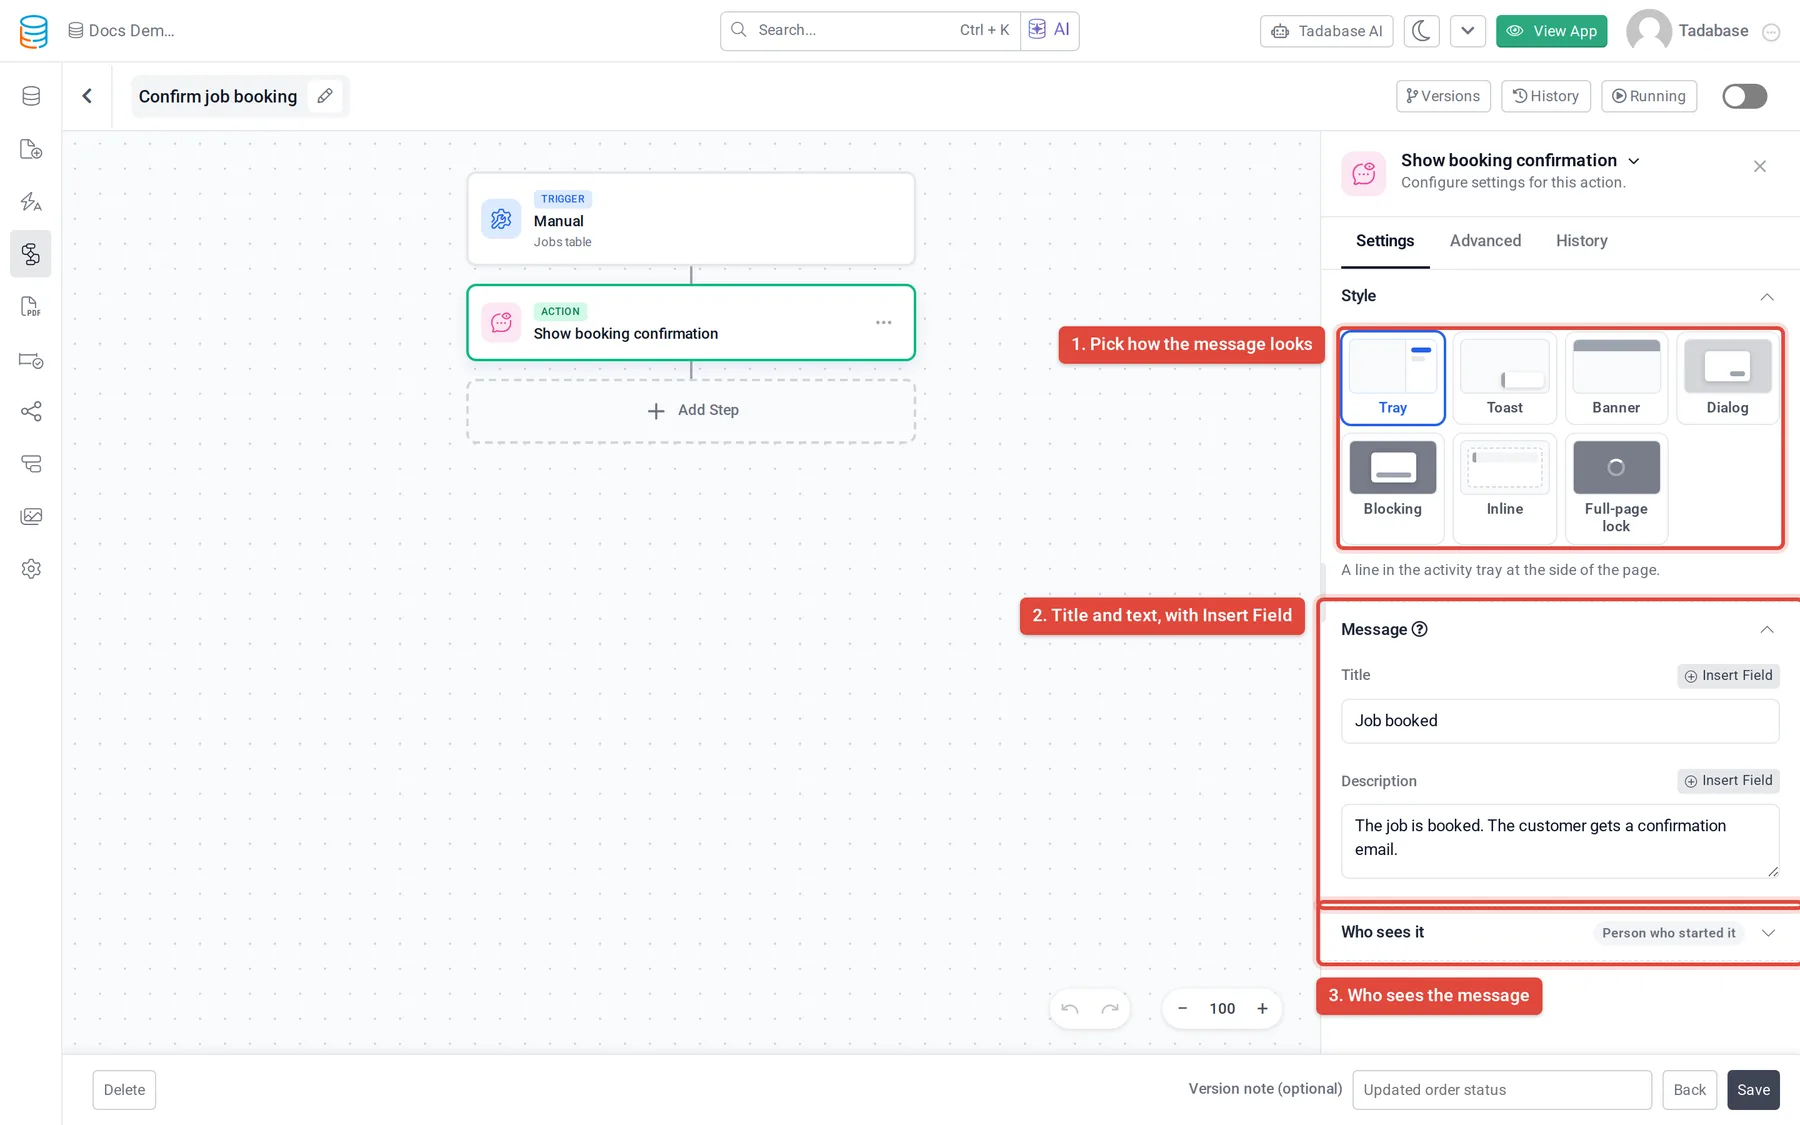
Message styles #
| Style | What people see | Settings |
|---|---|---|
| Tray | A line in the activity tray at the side of the page. | Title and Description. No buttons. |
| Toast | A small card in the corner of the page. | Tone, and Hide after (seconds) from 0 to 60. The default is 5; 0 keeps the toast on screen until it is closed. |
| Banner | A strip across the top of the page. | Tone, and Keep across pages to keep the banner when the user moves to another page, until it is closed. |
| Dialog | A window in the middle of the page. | Tone and Size (Small, Medium or Large). Can wait for an answer. |
| Blocking | A window the user can only close with one of its buttons. | Tone and Size. A blocking message with no buttons gets an OK button. Can wait for an answer. |
| Inline | A message inside the component that started the run. If that component is not on screen, it shows as a toast. | Tone. |
| Full-page lock | A cover over the page until the workflow finishes. | Lock text, and Release after (minutes) from 1 to 60 (default 5): the page unlocks when the workflow finishes, or after this many minutes at most. No buttons, and people cannot close it. |
Tone sets the color and icon: Success, Info, Warning, Error or Neutral. The default is Success.
Buttons #
A message can have up to 3 buttons. Every button closes the message. Under Then, click Add action to add what else it does, in order:
- Answer and continue: sends the button's Answer value back to the workflow. Only offered while the step waits for an answer (see below).
- Close the message.
- Refresh table components for a table you choose, Refresh this component, or Reload the page.
- Go to a page, with a Record ID (for detail pages), or Open a link, with Open in a new tab.
- Go back.
- Run this workflow again: runs the whole workflow again on the same record, so steps that create records or send emails run again.
- Run another workflow: runs the Manual workflow you choose on the same record.
- Copy text: copies the text you set, which can include inserted fields.
- Log out.
Ask a question and use the answer #
A Dialog or Blocking message shown to the person who started the run can pause the workflow until they click an answer.
- Use a dialog style Set Style to Dialog or Blocking. The Wait for the user's answer section appears.
- Turn on the pause Turn on Pause the workflow until they answer. Each button gets an Answer and continue action whose Answer value is the button's label. Change the values if later steps should see something else, such as
approved. - Set the time limit Set Wait up to (minutes), from 1 to 1440 (one day). The default is 15.
- Choose what happens on time-out Under When time runs out, choose Continue and pick the Answer to use when time runs out, or choose Stop the workflow.
- Use the answer In a later step, pick Step Data, then this Show Message step, then User's Answer. Add a Condition or Branches step to run different steps for each answer.
Besides User's Answer, later steps can use Answered By, Answered At, Timed Out (yes when nobody answered in time) and Answered In.
Show it to other people #
Under Who sees it, choose:
| Option | Who gets the message |
|---|---|
| Person who started it | The person whose click or change started this run. This is the default. |
| Users with roles | Every signed-in user with one of the roles you add under Roles. |
| People viewing this record | Everyone who has this record open when the step runs. |
| Users in a field | Every user picked in a user field of the record, up to 50. |
A message for other people shows as a toast, banner, dialog or blocking message. It cannot wait for an answer or wait until the workflow finishes, and its buttons cannot answer, run this or another workflow, or refresh the component that started the run.
Turn on Save for next visit so people who are not using the app when the step runs see the message the next time they open it. Keep for (days) sets how long it is kept, from 1 to 30 (default 7). Messages for People viewing this record cannot be saved.
Timing and closing #
The Behaviour section holds:
- When to show: As soon as this step runs (the default) or When the workflow finishes. Only for the person who started the run. A full-page lock always shows as soon as the step runs.
- User can close it: shows a close button and lets Esc or a click outside close the message. On by default. Blocking messages and messages that wait for an answer can only be closed with a button.
- In a loop or for many records: Once per run or Once per record. This shows when the step is inside a loop or the trigger is Manual or Schedule. A message for other people sent once per record sends at most 20 per run.
Check it worked #
Open the workflow's run history and expand the Show Message step. A shown message logs Show message: and its title. A message that was not shown logs the reason instead. See Workflow history and logs.
A Show Message step never stops the workflow, even if the message cannot be shown.
Was this page helpful?
Something wrong or missing on this page? Tell us.