
Save an import as an import template
Map a CSV file's columns to fields once and reuse the setup for every import, from the builder or from a page in your app.
- Verified Nov 17, 2026
- Classic builder
On this page
An import template saves which CSV column goes into which field of a table. Use one when you import the same kind of file again and again, for example a weekly export from your accounting system, or when you want people using your app to import files without the builder.
Create an import template #
Templates live under Automation > Import Templates, on the Table tab. (The API tab holds import connectors.)
- Add a template Click Add New Template.
- Fill in General Enter a Name (required) and an optional Description, and pick the Data Table the records go into. The other tabs appear once a table is picked.
- Choose how records are connected If the table has connections, How should imported records be connected? appears. Keep Import into this ... table, or link every imported record to the record the import is run from, or to the logged-in user. This choice cannot be changed after the template is saved.
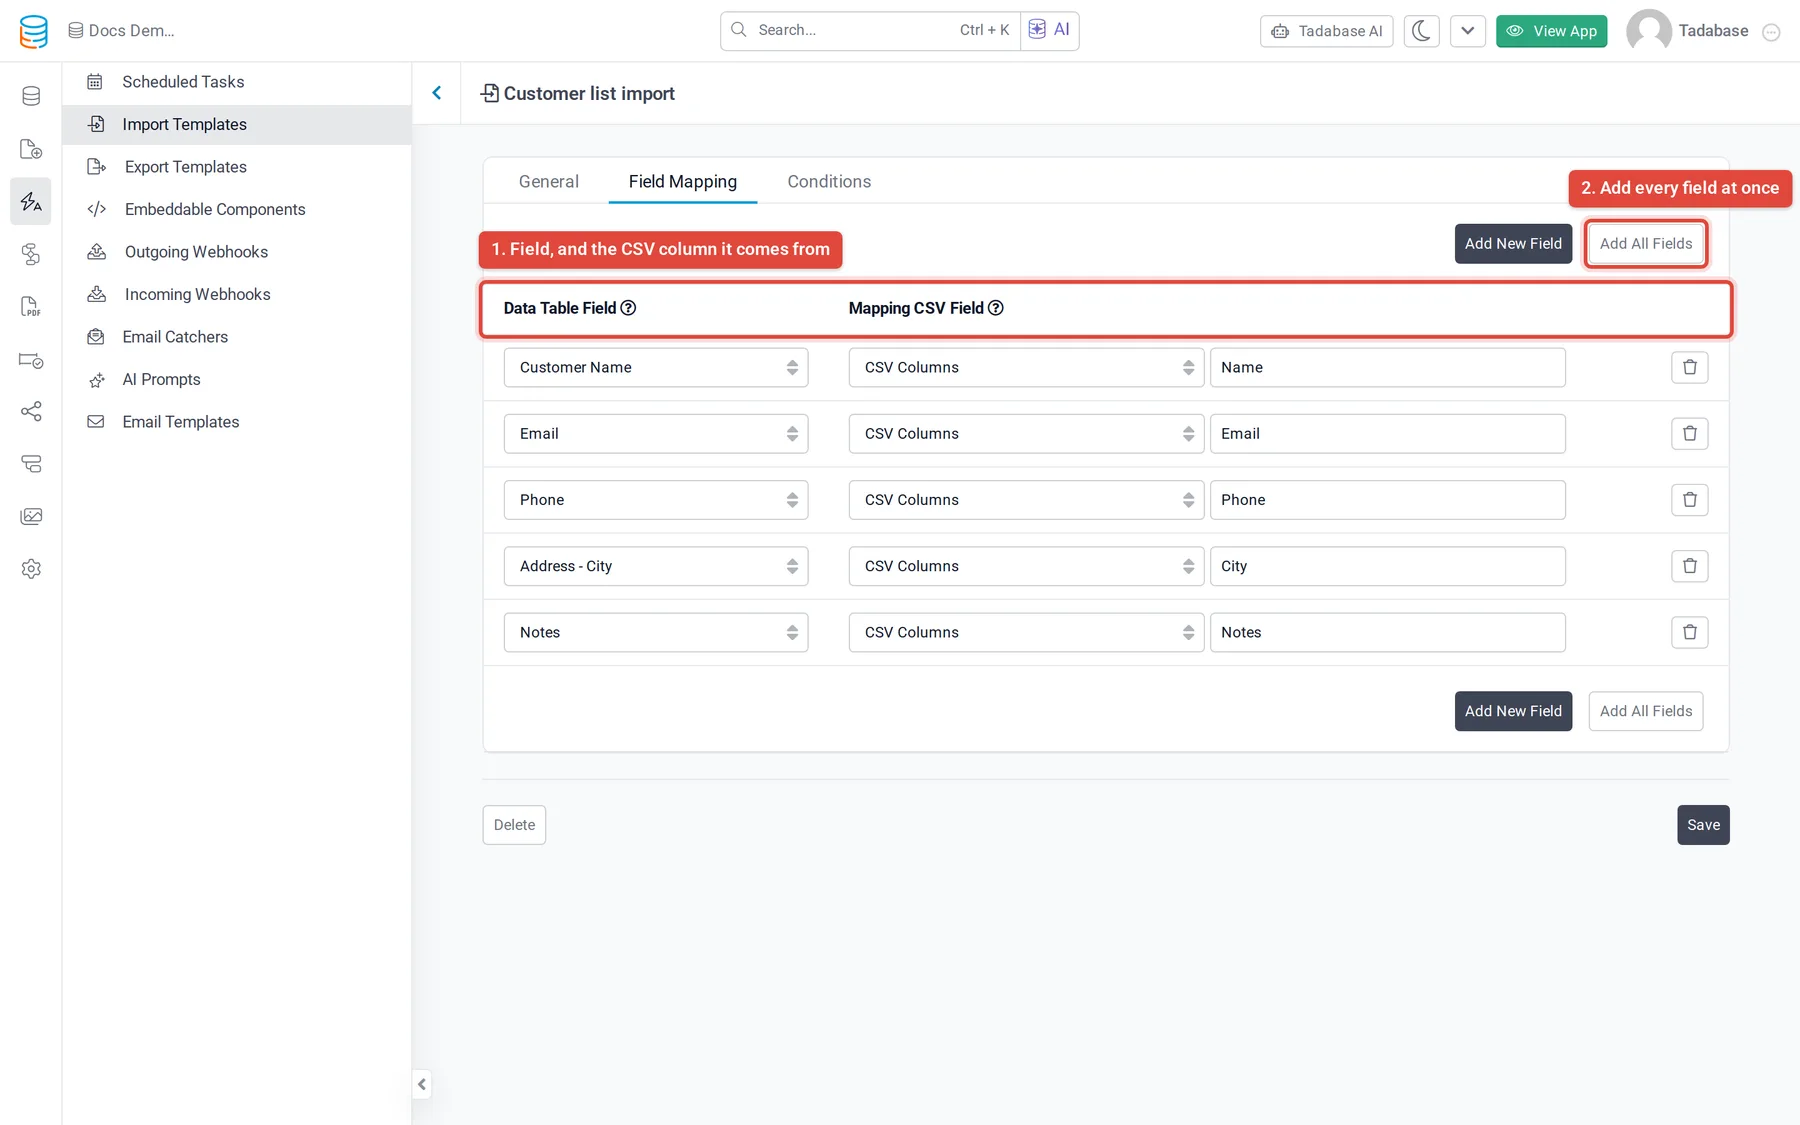
- Map the fields On Field Mapping, add fields and say where each value comes from (see below).
- Add conditions (optional) On Conditions, click Add Condition to import only the rows that meet it. Rows that do not match are skipped.
- Save Click Save.
You can also save a template at the end of the import wizard: turn on Save as Import Template on the Confirm your import step and enter a Template name.
How many import templates an app can have depends on your plan. If Add New Template is missing or the screen shows an upgrade button, your plan does not include more templates or importing.
Map columns to fields #
Click Add New Field to add one row, or Add All Fields to add every field of the table. In each row, pick the field under Data Table Field, then choose where its value comes from:
| Source | What to enter |
|---|---|
| CSV Columns | The column's name exactly as it is in the file's header row. It is case sensitive, so Email and email are different columns. |
| Custom Value | A fixed value that every imported record gets, whatever the file says. |
| Logged In User's Field | A field of the user who runs the import. This only has a value when the template is used from a page in your app. |
- For a Date field mapped to a column, choose the format the file uses:
MM/dd/yyyy(the default),MMM dd, yyyyordd/MM/yyyy. - For a Time field, choose
hh:mm a(the default) orHH:mm. - Name and Address fields are listed once per part, and a Date/Time field as its - Date and - Time parts, so each part can come from its own column.
- A connection field is listed once per field of the connected table, as Connection > Field. Pick the one your column holds, ideally a unique field such as an email or ID. Turn on Create new ... if record not found to add a connected record when none matches, then map its fields under Map columns to ....
- The file must have a header row: the template finds columns by name.
- Click the trash icon to remove a row.
Import with a template in the builder #
- Open the import Open the table in the Data Builder and click Import, then pick CSV file.
- Pick the template Set Import Type to Template and choose the Import Template. These two fields appear only when the table has at least one template.
- Add the file and continue Add the file and click Continue. The wizard skips column mapping and goes to Advanced Import Options, where you choose whether to add, update or skip matching records, then to Confirm your import.
On plans with the classic importer, set Import Type to Template, choose the template and the CSV file in the import form. See Import records from a CSV file.
See import logs #
On Automation > Import Templates, click Show Logs. The Import Logs window lists each import with its Data Table, Template Name, Type, Platform, User, Status, Total Records, Record Processed, Started At and Ended At.
- Click View Log to open Import Log Detail, a row-by-row list (Row #, Type, Message) of what went wrong. Export downloads it.
- Click Terminate to stop an import that is still running.
Let app users import #
To let people import from a page in your app, add an Import component to the page and choose one of the table's import templates as its source. The users never see the builder: they pick a file and the template does the mapping. The component's settings are described in Import component.
Create the template first: the component only offers templates that already exist for its table.
Was this page helpful?
Something wrong or missing on this page? Tell us.