
Build advanced searches with Enterprise Search
Add an Enterprise Search query builder with grouped AND/OR conditions, optional fields people can add, fields they can bypass, and saved searches.
- Verified Nov 17, 2026
- Classic builder
On this page
Enterprise Search is a query builder for your live app. People combine conditions in groups with AND/OR logic, add optional fields when they need them, switch fields off without removing them, and save searches to run again. Like the Search component, it filters other components on the same page that use the same data table.
Search or Enterprise Search? #
| Search | Enterprise Search | |
|---|---|---|
| Conditions | One form; Match All or Match Any across its fields | Groups of conditions, each with its own AND/ |
| Same field more than once | No | Yes, with Allow adding field again |
| Optional fields | No | Yes: people add them from Add Field or Add |
| Switch a field off | No | Yes, with Allow Bypass |
| Saved searches | No | Yes, for signed-in users, with Enable to Save search |
| Query preview | No | Yes, with Enable Query Preview |
| Look | Design tab | Five themes, seven color styles and three layouts |
Add Enterprise Search to a page #
- Add the results component On the page, add a Table, List or other data component for the table you want to search.
- Add Enterprise Search In the Page Builder, click Add Component in a column and choose Enterprise Search under Data Components.
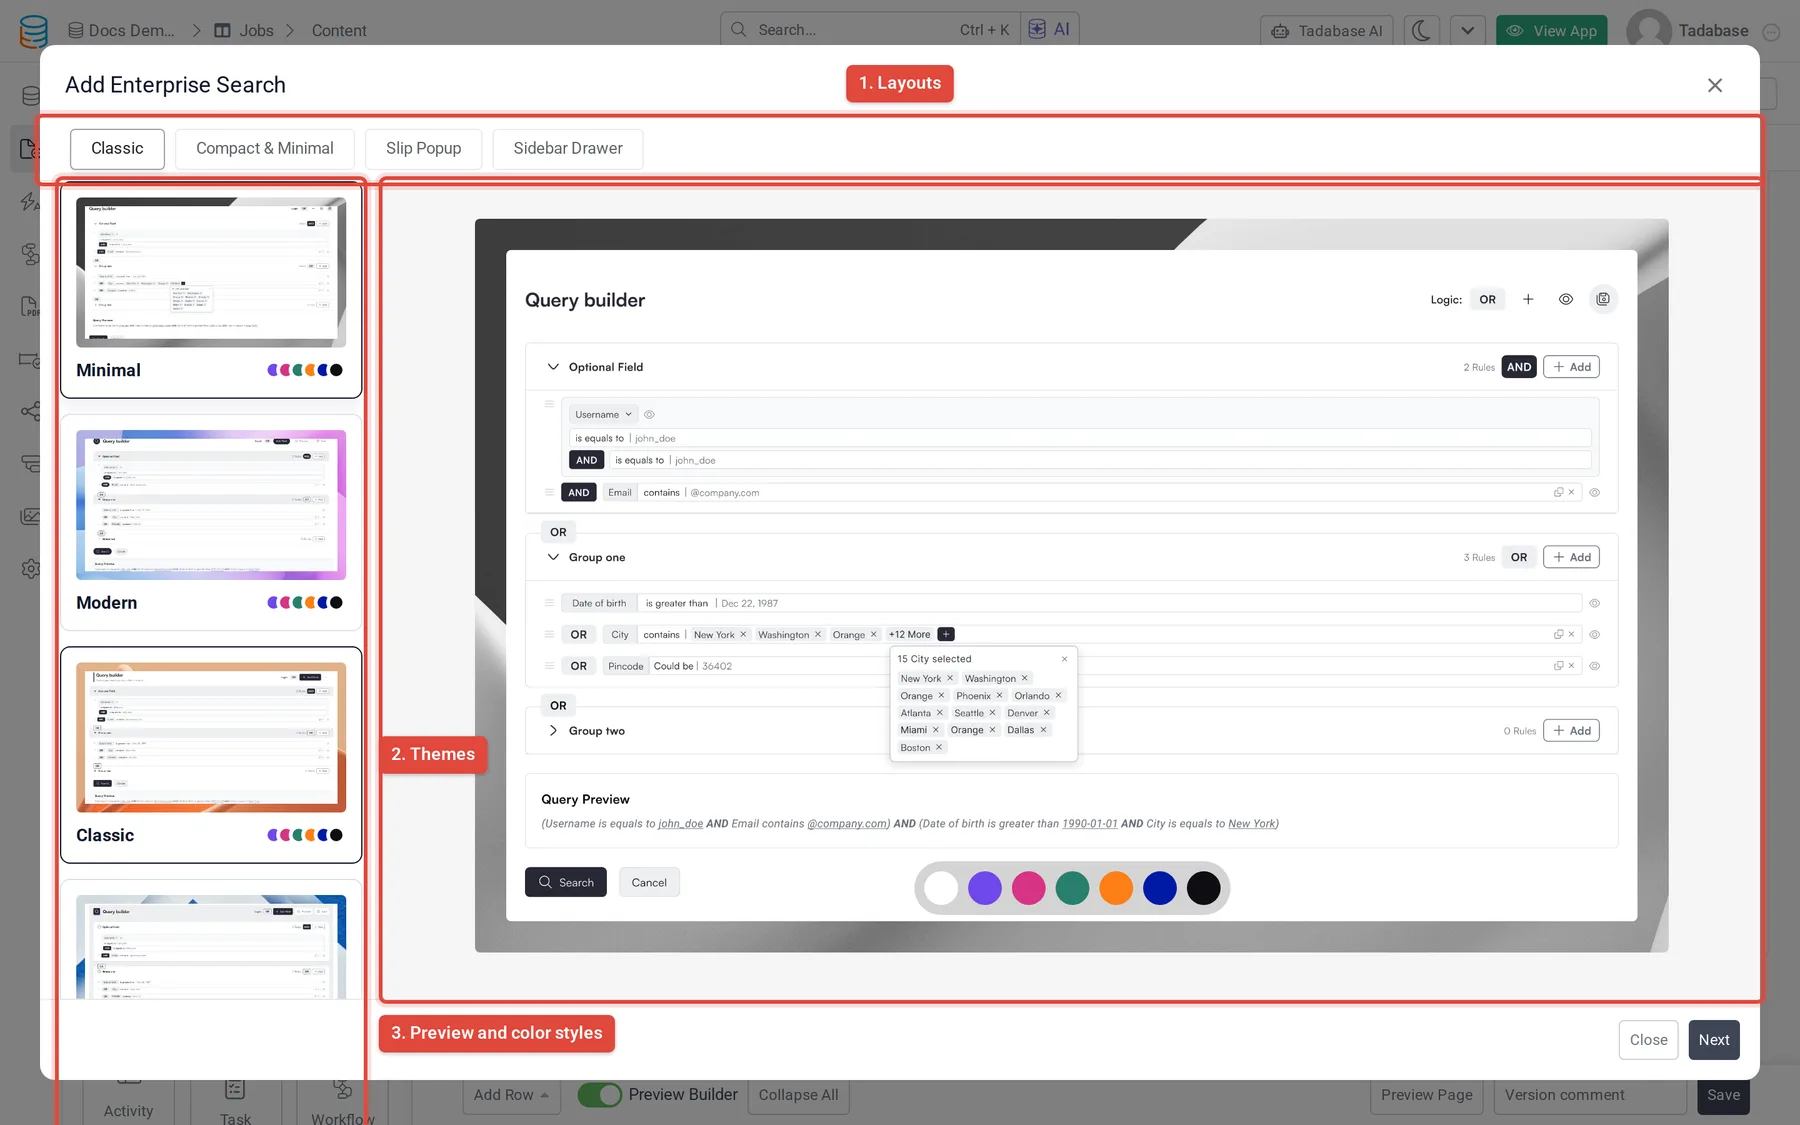
- Pick a layout and theme Choose a layout from the tabs across the top (Classic, Compact & Minimal or Slip Popup), then a theme on the left. Click a color dot under the preview to pick a color style. Click Next.
- Choose the table and the results Under Select Data Table, pick the table. Under Which data should this component search?, tick each component the search should filter (its Component ID is shown next to its name). Tick Only Load Upon Search if it should stay empty until someone searches. Click Next.
- Build the form On the Preview tab, add fields and groups (see below).
- Save Click Update & Save.
Once it is added, the settings window has five tabs: Preview, Optional Fields, Search Results, Options and Design.
Build the form on the Preview tab #
The Preview tab shows the form as people will see it, and you edit it in place:
- Click the title (
Query builderuntil you change it) to rename the form. - Click Add Field (the plus button) to add a field. Fields from connected tables are under Connected Fields.
- With Enable Grouping on, click Add Group to add a group of conditions. Each group has Add Field, Edit Group and Delete Group buttons.
- Click a field to open its settings, and drag fields to reorder them.
Adding or editing a group opens Add Row with Group:
| Setting | What it does |
|---|---|
| Group Name | The heading shown above the group. People can click it to collapse the group. |
| Allow Optional Fields | Lets people add optional fields to this group. |
| Match Type | How the group's conditions combine: Match All (AND), Match Any (OR) or User Choice, which shows an AND/ |
The gear button (Search Options) at the top of the tab turns the four settings described under Search options on and off.
Field settings #
Fields have the same settings as in the Search component (Title, Help, Required, Operators, Get Value From URL and the connection-field options), plus these:
| Setting | What it does |
|---|---|
| Allow adding field again | People can add the field more than once, for example two date ranges. Condition sets how the copies combine: Match All, Match Any or Let user decide. |
| Allow Bypass | Adds a Disable button to the field, so people can switch the condition off for one search without removing it. |
| Show Connected Table Name | For a field from a connected table: show the table's name with the field. Connected Table Display Name replaces that name. |
See Change a search field for the shared settings.
Optional fields #
Optional fields are not in the form when the page opens. People add the ones they need, which keeps a long search form short.
- Open the Optional Fields tab Click Optional Fields.
- Add fields Click a field under Fields or Connected Fields. It is added to the table of optional filters.
- Place them in a group (optional) With grouping on, click a row and choose a group under Choose where this optional filter should appear:. Only groups with Allow Optional Fields on are offered.
In the live app, optional fields are offered from an Add Field button at the top of the form, or an Add button on a group.
Search options #
The Options tab has the button settings (Submit Button Text, Search Button Icon, Clear Button Text and its icon) and these Search Options:
| Option | What it does |
|---|---|
| Enable Grouping | Lets you split the form into groups of conditions. |
| Default Conditions | Shown with grouping on: how the groups combine. Match All, Match Any, or User Choice, which shows a Logic: AND/ |
| Require at-least one search condition | The search only runs when at least one condition has a value. |
| Enable Query Preview | Shows a Query Preview under the form that spells out the conditions and groups being searched. |
| Enable to Save search | Shows a Save button so signed-in users can save and reuse searches. |
Change the look #
On the Design tab, open Theme:
| Setting | Choices |
|---|---|
| Theme | Minimal (default), Modern, Material, Classic, Bold |
| Style | Light (default), Royal Blue, Cerise, Sea Green, Burning Orange, Ultramarine, Dark |
| Layout | Classic Builder (default), Compact & Minimal Builder, Slip Popup |
Saved searches #
With Enable to Save search on, signed-in users see a Save button on the form. It opens Save Current Search:
- Type a name in Enter search name and click Save to keep the current conditions, including the optional fields that are added and the fields that are switched off.
- Click a saved search in the list to load it.
- Use the edit button to rename a saved search and the trash button to delete it.
Saved searches belong to the user who saved them and to this one component. People who are not signed in do not see the Save button.
Common problems #
| What you see | What to do |
|---|---|
| The live page shows a plan message instead of the form | Your plan does not include Enterprise Search. |
| No searchable components were found on the page | Add a Table, List or other data component for the same data table to the page first. |
| No Save button on the form | Turn on Enable to Save search, and sign in to the app. |
| The search returns fewer records than expected | Check for fields switched off with Disable, and turn on Enable Query Preview to see how the conditions combine. |
Was this page helpful?
Something wrong or missing on this page? Tell us.