
Add a Workflow component or Trigger Workflow button
Put a button on a page that starts a workflow, or add a Trigger Workflow button to each row of a table, list, kanban or details view.
- Verified Nov 17, 2026
- Classic builder
On this page
The Workflow component puts a button on a page that starts one workflow. A Trigger Workflow button does the same from each record shown in a table, list, kanban board or details view. Both replace the older action links that updated records or sent emails from a page.
This page covers the page side. To build the workflow and its trigger, see Triggering workflows from pages and buttons.
Before you start #
- Workflows must be on for the app, and your plan must include workflows. Otherwise Workflow is not listed under Data Components and Trigger Workflow is not in a component's Actions list.
- You need an active workflow whose trigger is Manual or Schedule. Inactive workflows and workflows with other triggers are never offered.
Which workflows you can pick depends on where the button sits:
| Where the button is | Workflows you can pick | What a click runs on |
|---|---|---|
| Workflow component on a page that shows one record (a details page) | Manual or Schedule workflows of the page's table | A Manual workflow runs on the page's record |
| Workflow component on any other page | Schedule workflows of any table | The Schedule workflow runs now instead of waiting for its schedule |
| Trigger Workflow button on a record | Manual or Schedule workflows of the component's table | A Manual workflow runs on that record |
Add the Workflow component #
- Open the page In the Page Builder, open the page and select the Components tab.
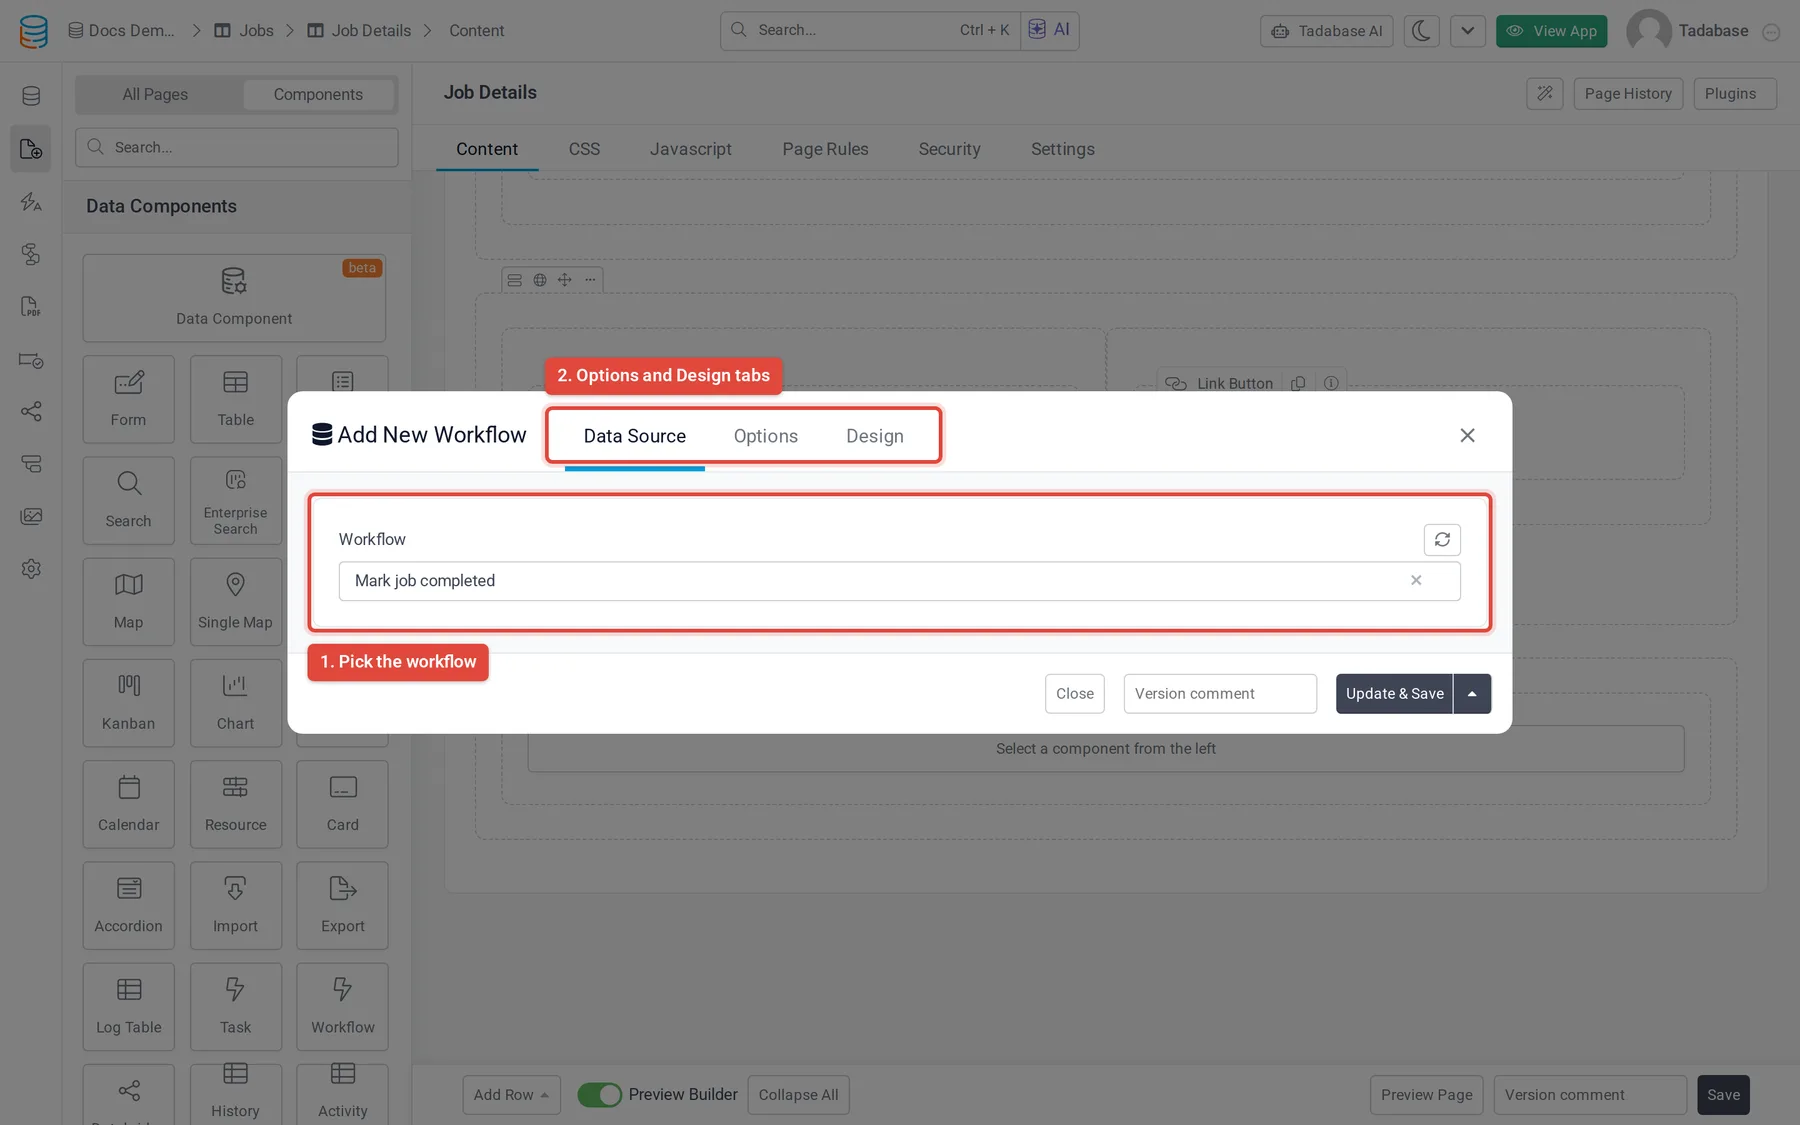
- Add the component Under Data Components, drag Workflow into the page, or click Add Component in a column and choose Workflow. The Add New Workflow window opens on the Data Source tab.
- Pick the workflow Choose it in Workflow. The list is grouped by table, with the page's own table first. If a workflow you just made is missing, click the refresh icon next to the list.
- Set the button On the Options tab, set the title, button text and the other options below. Use the Design tab to change how the component looks.
- Save Click Update & Save, or open the arrow menu and choose Update & Close to keep editing the page.
If no workflow fits, the window says There are no active Manual or Schedule workflows available for this detail page yet. (on a details page) or There are no active eligible Workflows available for this page yet., and you cannot save the component.
Options #
| Option | What it does | Default |
|---|---|---|
| Title | Heading shown above the button. | Empty |
| Description | Text shown under the title. | Empty |
| Workflow Button Text | The button's label. | Run Workflow |
| Button Icon | Icon shown before the label. | A play icon |
| Show Confirmbox on Run Workflow | Asks the user to confirm before the workflow starts. When on, set Confirm Title and Confirm Message. | Off (title Run Workflow, message Are you sure you want to run this workflow?) |
| Show History | Adds a History link to the component so users can see past runs. | Off |
| Show Progress Bar | Shows a bar with the number of records done while a run covers more than one record. | Off |
What users see when they click it #
- The button changes to Workflow in Queue, then Running..., then Workflow Complete, Workflow Failed or Workflow Cancelled.
- A Live Activity Log window opens and lists each step as it runs. Users can Cancel the run, Minimize the window to a small status pill, and click Close Log when it ends.
- After a successful run the component shows Workflow completed successfully!. After an error it shows the error and a Try Again button.
Add a Trigger Workflow button to records #
Use this to put a button on every row of a Table, List or Kanban component, or on a Details component, so users run a workflow on that record.
- Open the component Open the Table, List, Kanban or Details component's settings and expand Actions in the fields panel.
- Add the button Click Trigger Workflow. If it shows a red warning icon, the table has no active Manual or Schedule workflow yet.
- Pick the workflow In the column settings that open, go to the Set Workflow tab and choose it in Select Workflow.
- Choose how it runs On the General tab, set the button's Title. Turn on Run Behind the Scenes to let users keep working while the workflow runs. With it on, Show Progress Notifications (on by default) shows live progress and a completion notice; turn it off to run silently.
In a Data Component, add a Trigger Workflow button from the component's buttons list, then pick the workflow under Workflow Run Settings in Select Workflow. See Data Component.
Common problems #
| Message or symptom | Cause and fix |
|---|---|
| Workflow is not in the Components list | Workflows are off for the app, or your plan does not include them. |
| The workflow is not in the list | It is inactive, its trigger is not Manual or Schedule, or (on a details page) it belongs to another table. Activate it or change the trigger, then click the refresh icon. |
This workflow is inactive. Activate it in Workflows before running it. | The workflow was switched off after you added the button. Activate it again in Workflows. |
This Manual workflow requires a record. | A Manual workflow was started without a record. Put the button on a details page or use a Trigger Workflow button on a record. |
To see what a run did, use the History link or the workflow's run history. See Workflow history and logs.
Was this page helpful?
Something wrong or missing on this page? Tell us.