
Add edit, details and other record links
Add Edit, Delete, Record Details, Connected Page and Record History links to a data component, rename them, show them as buttons or hide them with rules.
- Verified Nov 17, 2026
- Classic builder
On this page
Links are columns that act on the record in their row: open a form to edit it, open its details page, open another page about it, show its change history, or delete it. You add them in the component's settings and can show them as text links or buttons.
Add a link #
- Edit the component In the Page Builder, hover over the component and click the pencil (Edit).
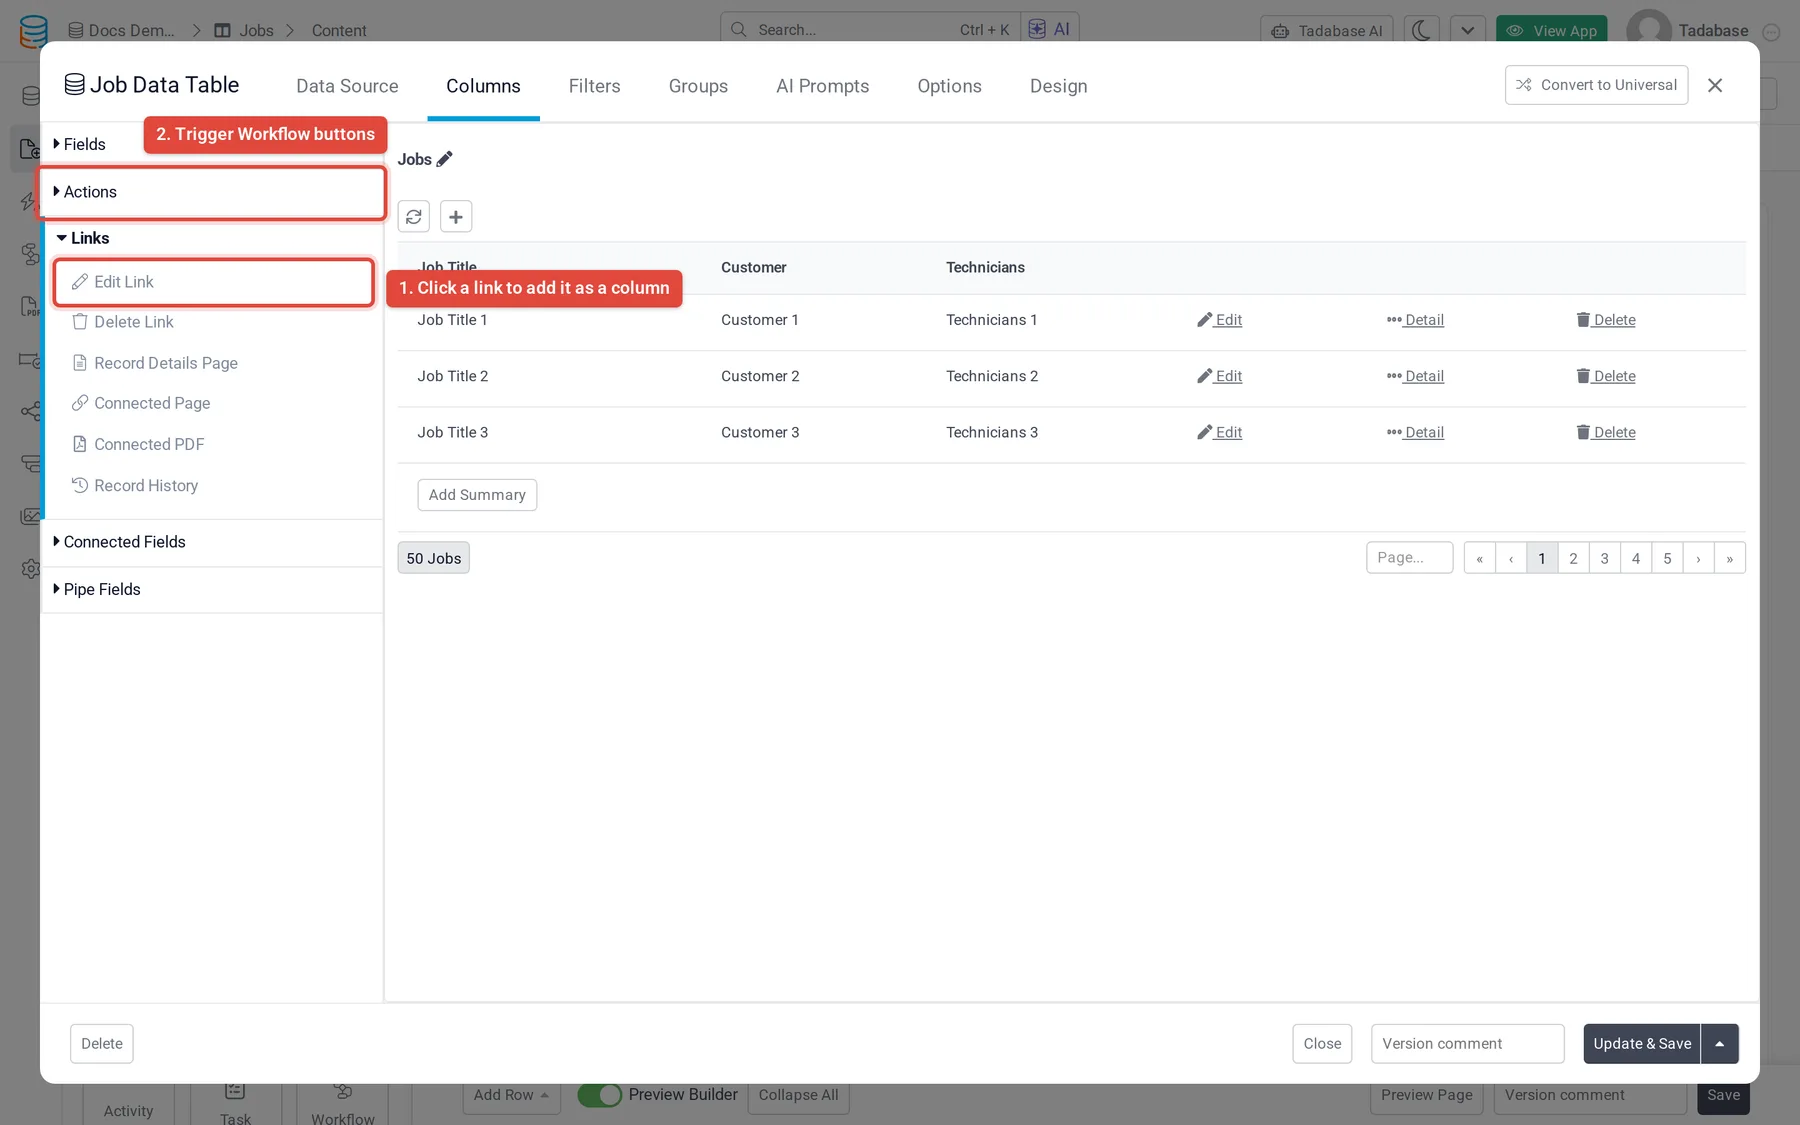
- Open the list of links Open the tab that lists the component's columns or fields (Columns on a table, Fields on a list or details component) and click Links on the left.
- Add the link Click a link type. It is added as a new column at the end; drag it where you want it.
- Save Click Update & Save.
Link types #
| Link | What it does |
|---|---|
| Edit Link | Opens a form to edit the record. Adding it also creates a child page with an edit form for the record, which you can change like any page. |
| Delete Link | Deletes the record after the user confirms. Set the question in Confirm message; the default is Are you sure you want to delete this record?. Details components have no Delete Link. |
| Record Details Page | Opens a page that shows the record. Adding it also creates a child details page. You can add other components to that page, for example a form that acts on the record. |
| Connected Page | Links to a page you already have, for example a customer's details page from a jobs table. Pick the page in the Link to Page box. Shown when there is a page to link to. |
| Connected PDF | Opens a PDF page for the record. Shown on tables, lists and details components when the app has a PDF page to link to. |
| Record History | Opens a window with the record's change history. Offered on tables, lists, details components and kanbans. |
Give your details pages clear names in the page settings. The Link to Page box lists pages by name, so two pages called Customer Details are hard to tell apart.
Open in a pop-up or a new window #
For Edit Link, Record Details Page and Connected Page, open the link's settings (on a table, click its column heading on the Columns tab). On the General tab:
- Show in Popup opens the page in a pop-up over the current page. Enter the pop-up's heading in Popup Title.
- Open link in new window opens the page in a new browser tab. It is offered while Show in Popup is off.
Change the link text and icon #
Open the link's settings and use the General tab:
| Setting | What it does |
|---|---|
| Hide Column Title | Hides the column heading. New links start with it on, which also hides the Title box. Turn it off to see and change the title. |
| Title | The link text, also used as the column heading when the heading is shown. A new link starts with Edit, Delete, Details or Record History. |
| Use a Field Value as the Link Text | Shows a field of the record as the link text instead, for example the customer's name. |
| Icon and Icon Align | Adds an icon to the link, on the Left (default) or Right of the text. |
Show a link as a button #
On the link's Format tab, change Link Type from Link to Button. The button options appear, with a preview:
| Option | Choices |
|---|---|
| Style | Solid (default) or Outline |
| Fill | Inline (default) or Block (full width of the column) |
| Size | Small (default), Medium or Large |
| Color | Primary (default), Success, Danger, Info, Warning or Default |
The same tab sets Column Width (Auto or Custom) and Alignment.
Show or hide a link with display rules #
A link column has a Display Rule tab like any other column. Use Hide Value to hide the link on some records, for example hide the Edit link when Status is Completed, or Set Text Color to color it. See Change colors and hide values with display rules.
Make a connection value clickable #
Instead of a separate link column, a connection column can link straight to a page. Open the connection column's settings and choose a page in Value Link (default No Link). For example, on a jobs table the customer's name then opens the customer's details page.
Buttons that run a workflow #
To add a button that does something to the record, such as mark a job complete or send an email, use a Trigger Workflow button. On a table it is in the Actions list, next to Links, on plans that include workflows. It stays greyed out until the table has at least one active Manual or Schedule workflow.
- Add the button On the Columns tab, click Actions, then Trigger Workflow. The column's settings open.
- Choose the workflow On the Set Workflow tab, pick the workflow the button runs.
- Choose how it runs On the General tab, Run Behind the Scenes (off by default) runs the workflow in the background so users can keep working; Show Progress Notifications then shows its progress. On tables and lists, Reload Records (on by default) refreshes the records afterwards and Show Loading Indicator shows a full-page loading indicator while it runs.
Was this page helpful?
Something wrong or missing on this page? Tell us.