
Add a login form to your app
Use the Login component to let app users sign in, choose which roles and statuses may log in, set up forgot password, redirect rules and error messages.
- Verified Nov 17, 2026
- Classic builder
On this page
The Login component is the form your app's users sign in with. Besides email and password, it holds the forgot password, two-factor, magic link and single sign-on screens when those are turned on for your app. Every app already has a login page; add more Login components when different users need different login pages.
The default login page #
Every new app comes with three pages under Default Pages in the Page Builder: Login, Sign Up and Profile. A pin icon marks them as default pages. You can edit them, but you can't delete them: their menu has no Delete option. The Login page holds a Login component.
To let users find the login page, use one of these:
Add a Login component to a page #
- Open the page In the Page Builder, open the page or layout where the form should go.
- Add the component Add a component to a column and choose Login. It is listed with Signup and Profile.
- Set it up The Login Form settings window opens. Change the tabs described below as needed.
- Save Click Update & Save.
To change a Login component later, point at it on the page and click the pencil (Edit) icon.
| Tab | What it holds |
|---|---|
| Forms | The text and layout of each screen of the component: login, forgot password, reset password, two-factor code and the others listed below. |
| Email Template | The emails the component sends: forgot password code, password reset confirmation, magic link, password expiry and 2FA code. |
| Login Redirect Rules | Which page each role goes to after logging in. |
| Options | Who may log in here, the already-logged-in message, error messages and the screen that shows first. |
| Design | Colors, fonts and spacing of the component. |
Edit the login screens #
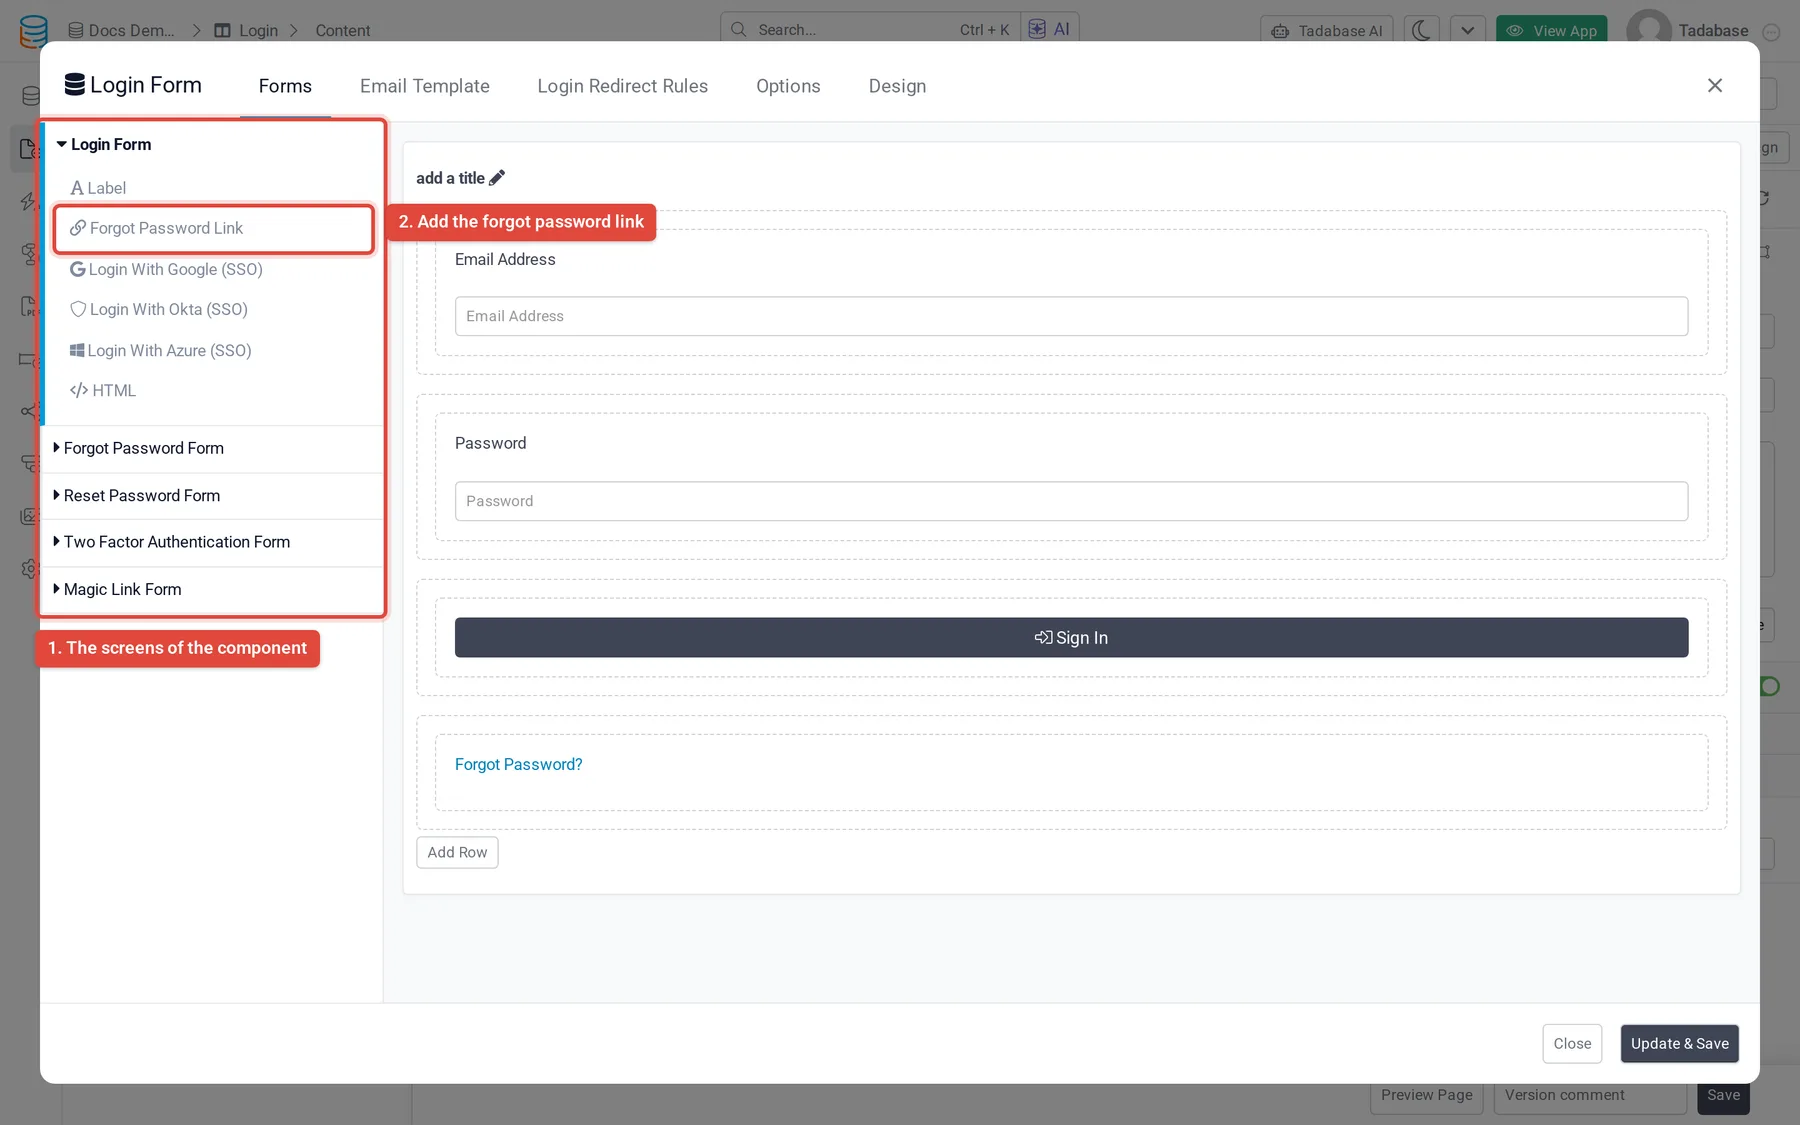
On the Forms tab, the left side lists the screens of the component. Click one to edit it on the right: change its title, add rows with Add Row, and drag items into place. Every screen can take a Label or HTML block.
| Screen | When users see it |
|---|---|
| Login Form | The email and password form with the Sign In button. You can also add a Forgot Password Link here, and a Login With button for each single sign-on provider that is on. |
| Forgot Password Form | After clicking the forgot password link: the user enters their email and clicks Send Verification Code. |
| Reset Password Form | The user enters the code from the email, a New Password and Confirm Password, then clicks Reset Password. |
| Two Factor Authentication Form | When two-factor authentication is on: the user enters the 6-digit code sent by email. |
| Single Sign On (SSO) Form | Only listed when email logins are turned off and a single sign-on provider is on. The other screens then show the warning "Email Logins are disabled in the User Settings. This form will not appear in your live app." |
| Password Expiration Form | Only listed when passwords expire in your app: shown to a user whose password has expired. |
| Password Warning Form | Only listed when your app warns users before their password expires. |
| Magic Link Form | Only listed when magic links are on and the app has a magic link template. Choose the template in Magic Link Template. |
Forgot password link and emails #
A new Login component includes a Forgot Password? link under the Sign In button. To remove it, delete it from the Login Form screen; to add it back, click Forgot Password Link in the list on the left.
On the Email Template tab you set the emails the component sends. For each one, choose Use Template to pick one of your app's email templates in Select Template, or Custom to write the Subject and Email Template here.
| Default subject | Placeholders you can use | |
|---|---|---|
| Forgot Password Template | Password reset on {appName} | {name}, {toEmail}, {appName}, {code} (the verification code) |
| Forgot Password Success Template | Your Password Has Been Successfully Reset on {appName} | {name}, {appName} |
| Magic Link Template | Your Magic Login Link | {name} |
| Password Expiry Template (only when passwords expire) | Password expiry on {appName} | {name}, {code} |
| 2FA Template | 6 Digit Authentication Code on {appName} | {name}, {appName}, {code} |
Choose who can log in here #
On the Options tab:
- Allowed Roles: All Users (the default) lets anyone with an account log in. Only Users in Specific Roles lets in only users with a role you add with Select Roles. Write the message other users see in Custom Error Message For Roles.
- Allowed Status: Any User Status (the default), or Specific User Status to allow only the statuses you add with Add Status. The list comes from the Status field of the Users table. Write the message other users see in Custom Error Message For Status.
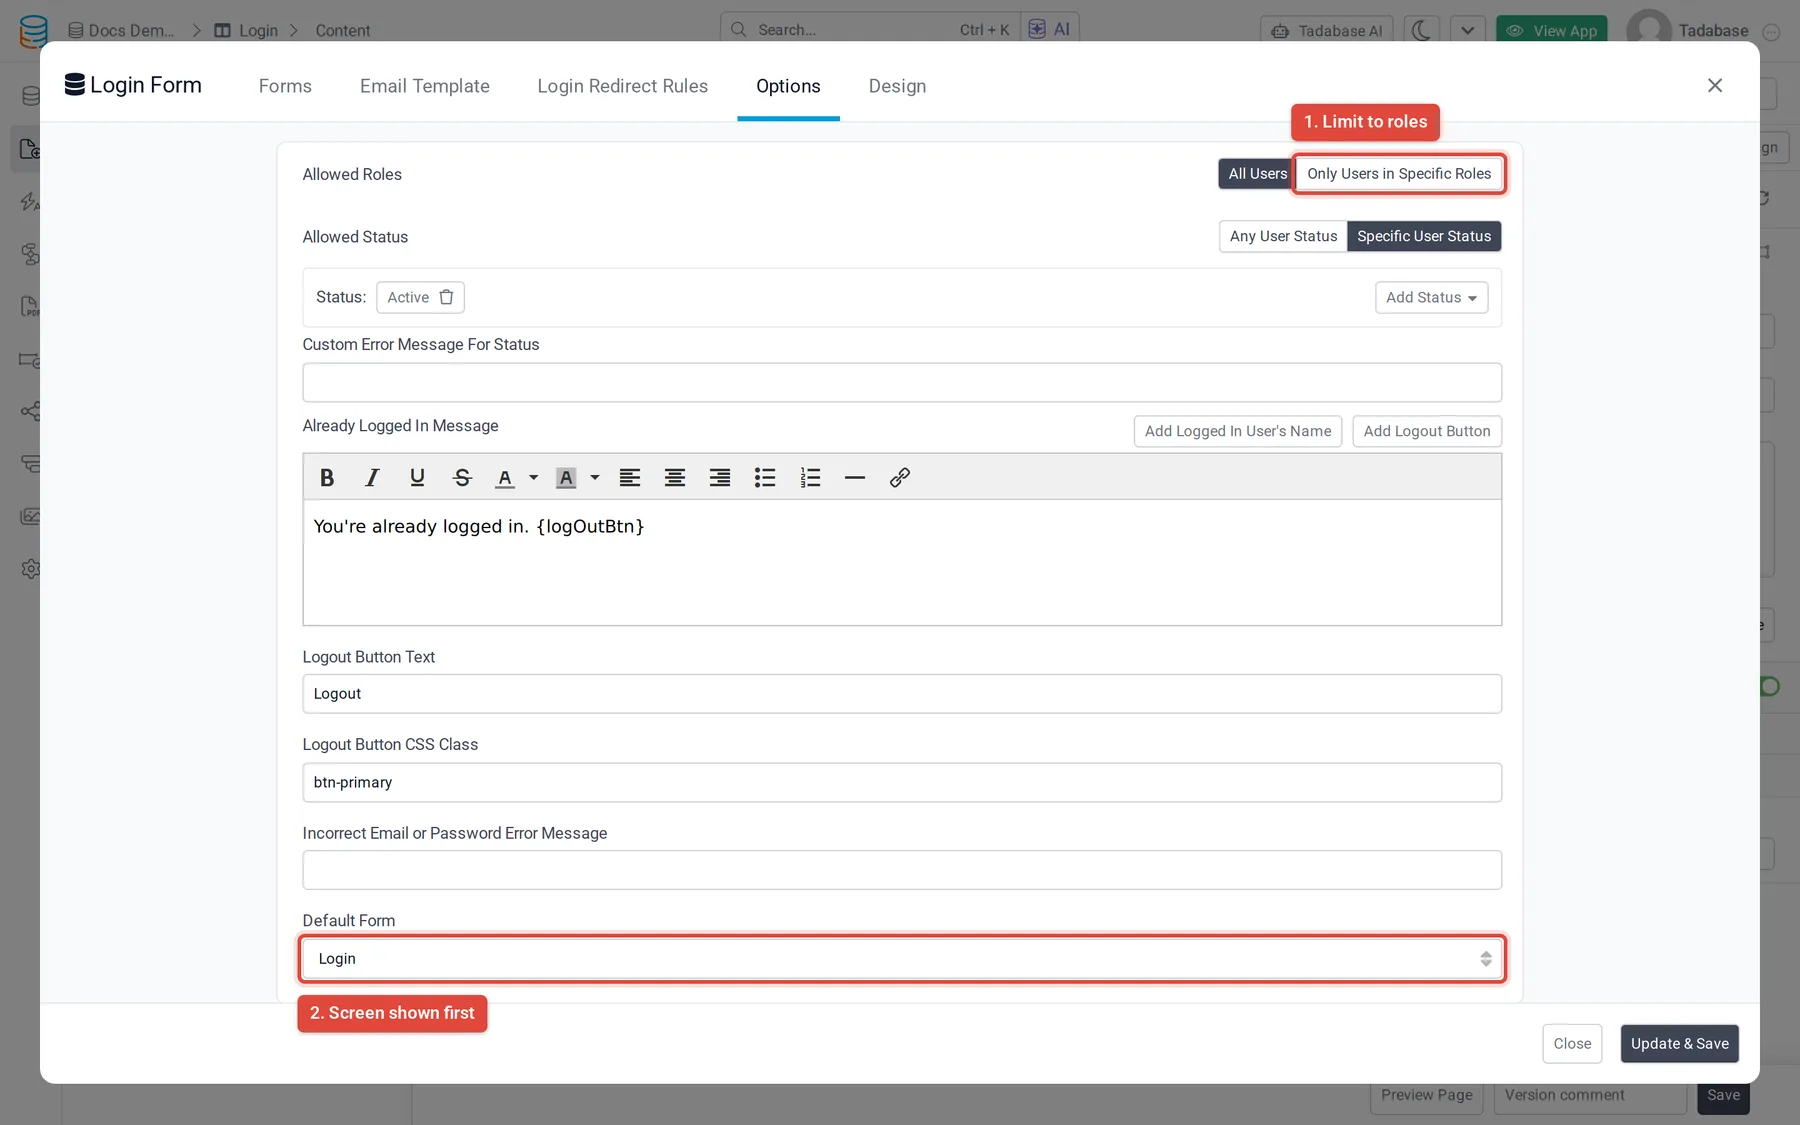
To give each role its own login page, add a Login component to each page and allow only that role on it. For roles and statuses, see Create user roles and assign users to them and Add and manage app users.
Messages and the first screen #
| Option | What it does |
|---|---|
| Already Logged In Message | Shown instead of the form to a user who is already logged in. Add Logged In User's Name and Add Logout Button insert those into the message. Default: "You're already logged in." followed by a logout button. |
| Logout Button Text | The label of that logout button. Default: Logout. |
| Logout Button CSS Class | CSS classes for the logout button. Default: btn-primary. |
| Incorrect Email or Password Error Message | Shown when the email or password is wrong. |
| Default Form | The screen the component opens on: Login, Forgot Password, or Magic Link (when magic links are on). |
Send users to a page after they log in #
- Open the rules Go to the Login Redirect Rules tab and click Add New Redirect Rule.
- Pick the role In If Role is, choose a role, or All Users.
- Pick the page In Then redirect to, choose a page, or App Home Page.
- Add more rules Click Add New Redirect Rule again for each role. Remove deletes a rule.
- If no rule matches the user, they go to the app's home page.
- A rule for All Users matches everyone. If a user matches more than one rule (for example a user with two roles), they end up on the page of the last matching rule in the list, so put the most specific rules last.
- Turn on Override redirect rules if user was redirected from a protected page to send users who were sent to log in from a protected page back to that page, instead of following the rules.
Two-factor, magic links and single sign-on #
These are turned on for the whole app in User Settings, and then appear in every Login component:
- Codes sent by email after the password: Require two-factor authentication for app users.
- Logging in from a link sent by email: Let users log in with a magic link.
- Google, Microsoft and other providers: Let users log in with single sign-on (SSO).
- Password length, complexity and expiry: Set password rules for app users.
Was this page helpful?
Something wrong or missing on this page? Tell us.