
Add a form to create or edit records
Add a Form component that creates new records or edits existing ones, lay out its fields and connected fields, and set its submit button and title.
- Verified Nov 17, 2026
- Classic builder
On this page
A Form component lets people add a new record or change an existing one from your live app. You choose what the form does when you add it, then lay out its fields.
Add a form #
- Add the component In the Page Builder, open the page, click Add Component in an empty column and choose Form under Data Components.
- Choose what the form does The window asks What would you like this form to accomplish? Select one option (see the table below).
- Add the fields Click Quick Add to add every editable field in two columns (three when the table has more than ten), or Customize to place the fields yourself.
- Save Click Update & Save to save and keep editing, or Update & Close.
| Option | When you see it | What the form does |
|---|---|---|
| Create a form to add new records within this data table | Always | Adds a new record to the table you pick. |
| Create a form to add a record and connect the record to the logged in user | When a table has a connection field to the Users table | Adds a new record and fills that connection field with the person who submits the form. |
| Create a form to edit this page's record | On a page that shows one record | Edits the record the page is showing. |
| Create a form to add new records connected to this (record) | On a page that shows one record, when another table connects to or from the page's table | Adds a record and connects it to the page's record, for example a new job for the customer being viewed. |
| Create a form to edit an existing record connected to this (record) | Same as above | Edits a record connected to the page's record. |
Lay out the fields #
The Inputs tab has the list of things you can add on the left and the form layout on the right. Click an item on the left to add it to the form, then drag fields between rows and columns. Hover over a row to add a column.
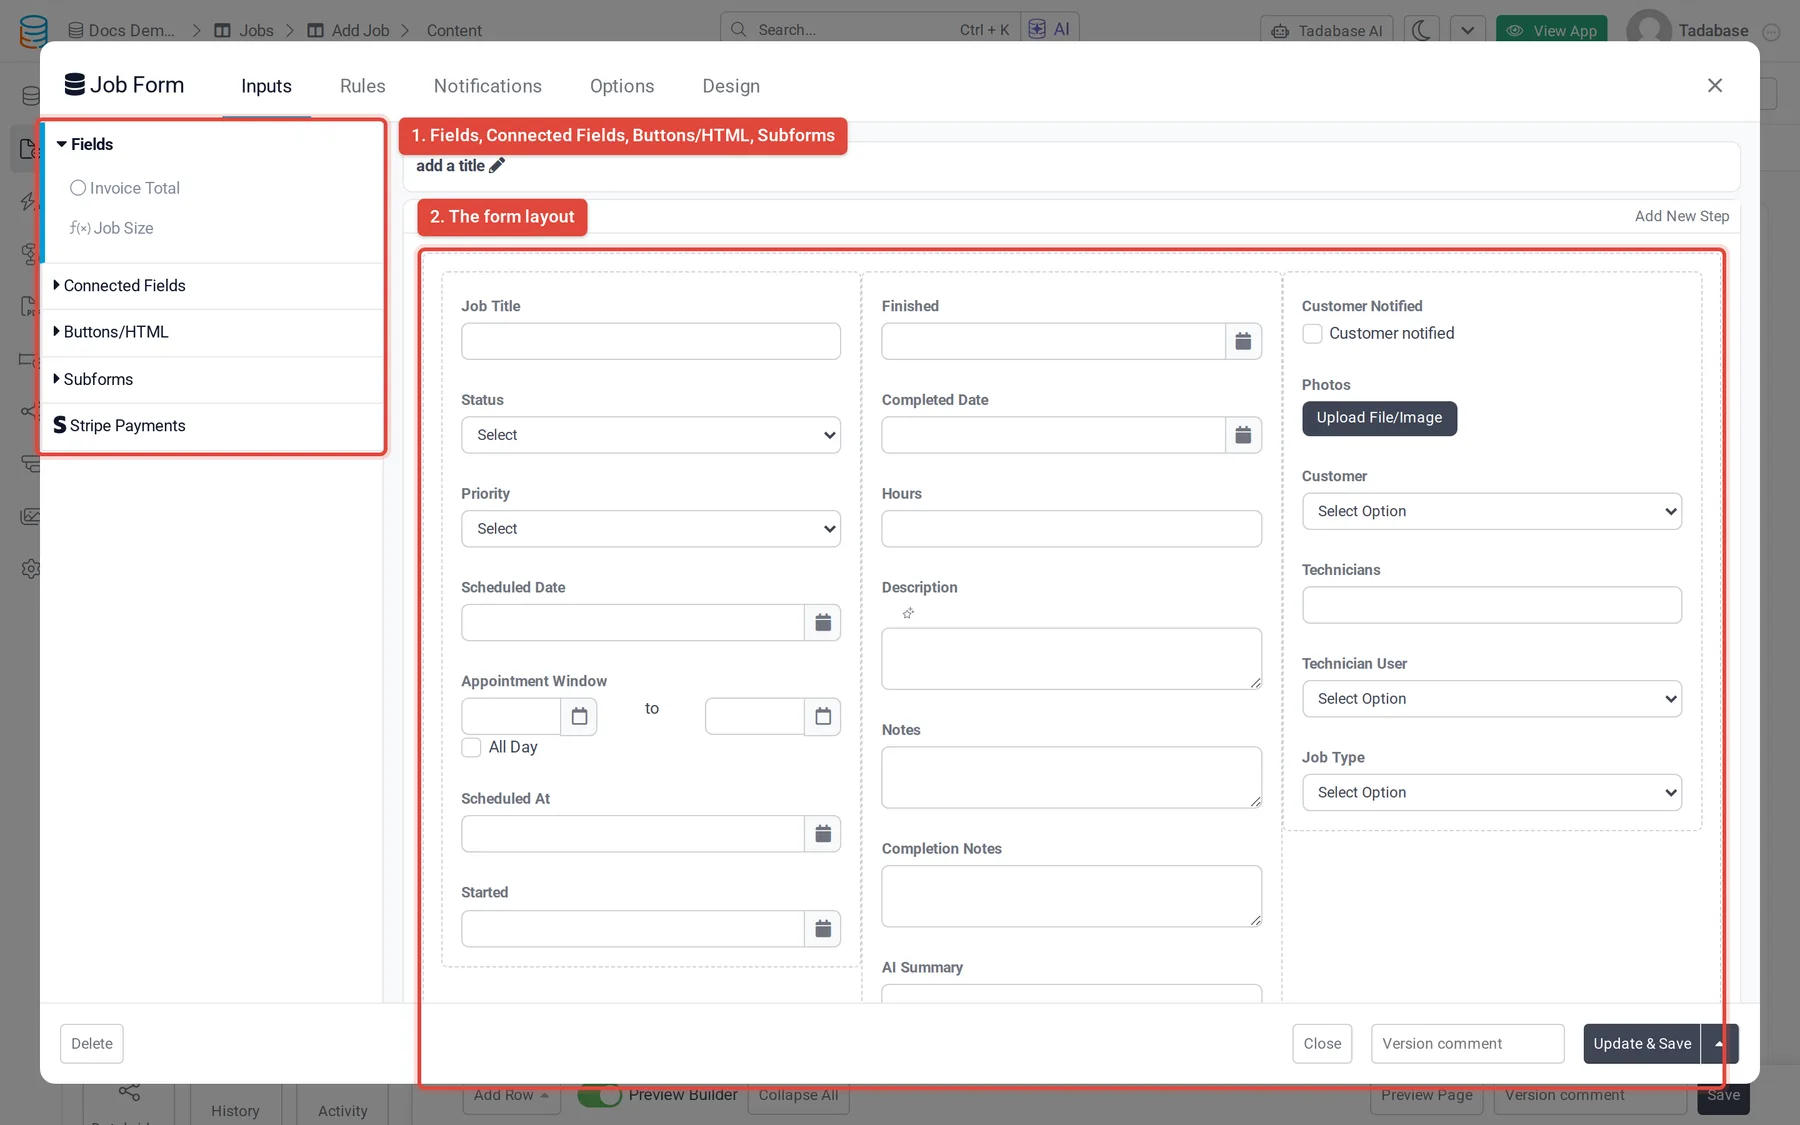
| List | What it adds |
|---|---|
| Fields | The fields of the form's table that are not on the form yet. |
| Connected Fields | Fields of a table connected to the form's table, so one form can fill in values on the connected record too. If the form's table has several connections, pick the table from the drop-down at the top of the list. |
| Buttons/ | HTML for headings and instructions, Trigger Pipe and Trigger AI Prompt when the app has pipes or AI prompts, and Previous Button, Next Button and Submit Button when the form has more than one step. |
| Subforms | A grid of rows for a connected table, so people can add several connected records while they fill in the form. Pick a connected table to open its settings: the fields, grouping and subtotals, and the minimum and maximum number of rows. |
To split a long form into steps, click Add New Step above the layout. Each step gets its own tab, and Step Settings sets how the steps look.
Change a field's settings #
Click a field in the layout to open its settings. The General tab has the options most forms need:
- Title and Help Text (shown under the field, or as a tooltip with Show as tooltip).
- Required and Disabled/Read-Only.
- Sort Alphabetically for drop-down, radio and checkbox fields.
- Get Value From URL, to fill the field from a URL parameter you name (on forms that add records; not for connection, file, image or signature fields).
- Options that depend on the field type, such as Restrict Date for dates, Maximum File Size(MB) and Accepted Files for files, and Field Height for long text.
Other tabs appear when they apply: Default Value to set the value the field starts with on this form, Design for label text and CSS class, and AI Prompts when AI prompts are available in your app.
Connection field options #
A connection field lets people pick a record from another table. Its settings add:
| Option | What it does |
|---|---|
| Connection Field Style | Dropdown (default), List View or Table View. List and table views show up to four fields of each record. |
| Allow Inserting New (record) | Adds a button that opens a form to create a new connected record. Set its Add New Record Button Text and Add New Record Popup Title. |
| Total Records to load | How many records the drop-down loads at first. Records beyond that are searched as the person types. |
| Show | Limits the choices to records connected to a value picked in another connection field on the form (a dependent drop-down). |
| Limit to (table) Logged-In User is connected to | Limits the choices to records the signed-in user is connected to. Shown when such a connection exists. |
| Filter Records tab | Limits the choices with conditions. |
Submit button and form title #
Click add a title above the layout to give the form a title. The submit button is set on the Options tab, under Submit Button Options:
| Option | What it does |
|---|---|
| Disable form from being submitted | Shows the form but does not let anyone submit it. |
| Submit Button Text | The text on the button. |
| Submit Button CSS Class | Class names for your own styling. |
| Submit Button Display Rule | Click Add New Rule to change the button while the form is filled in, based on the form's values: for example change its text or color, or disable it. |
The Options tab also has the label position for all fields (Field Label Options), a spinner while the form submits (Spinner Options), and Advanced Options such as Preserve Form Values, which restores what was typed if the page reloads before submitting.
What happens after submit #
The Rules tab sets what the form shows and checks, and where people go after submitting: display, submit and validation rules. The Notifications tab sends emails and text messages. See Set form display, submit and validation rules.
To change other records when a form is submitted, use a workflow. Workflows replaced the older Record Rules: open Rules > Workflows to attach a manual workflow on the form's table, or see Workflows overview.
Was this page helpful?
Something wrong or missing on this page? Tell us.