
Create a PDF from a page
Build a PDF Page from tables, lists, details and other components, choose List or Detail, style it with a layout, and let people download it.
- Verified Nov 17, 2026
- Classic builder
On this page
A PDF Page is a printable document you build from components, such as a table of open jobs or an invoice for one record. Use it when you want to design the document yourself. To fill a PDF file you already have, use a PDF Form instead.
Create a PDF Page #
- Open PDF Pages In the builder's left bar, click the PDF icon, then PDF Pages.
- Add a page Click Add New PDF Page.
- Name it Enter a Name and, if you like, a Description.
- Choose the Data View Type Pick List to show many records, or Detail to show one record. For Detail, also choose the Data Table the record comes from.
- Save Click Save. The PDF Page editor opens on its Content tab.
Before you design the page, you may want a PDF layout for the paper size, margins, header and footer. You can assign one at any time.
List or Detail #
| List | Detail | |
|---|---|---|
| Shows | Records from any table, through the Table, List and Card components you add | One record of the chosen table, plus its connected records |
| Details component | Not available | Available |
| Printed from | A PDF Print button | A PDF Print button on that table's details page, a Connected PDF link, a form email, or a workflow |
For example, to download every open job in one PDF, use a List PDF Page. To download an invoice for one job from a row in the Jobs table, use a Detail PDF Page on the Jobs table.
The type is set when you create the page. The list of PDF Pages shows each page's Type and Table.
Add components #
- Add a row At the bottom of the Content tab, click Add Row and choose 1 Column, 2 Columns, 3 Columns, 4 Columns or 6 Columns. Row Separator adds a divider line.
- Drag in components Drag a component from the left panel into a column. Under Data Components: Table, List, Details (Detail pages only) and Card. Under System Components: HTML, Image and Page Break.
- Set it up Click the component to choose its fields and options. PDF components have fewer options than the same components on app pages.
- Save and preview Click Save, then Download Preview to download the PDF as it prints now.
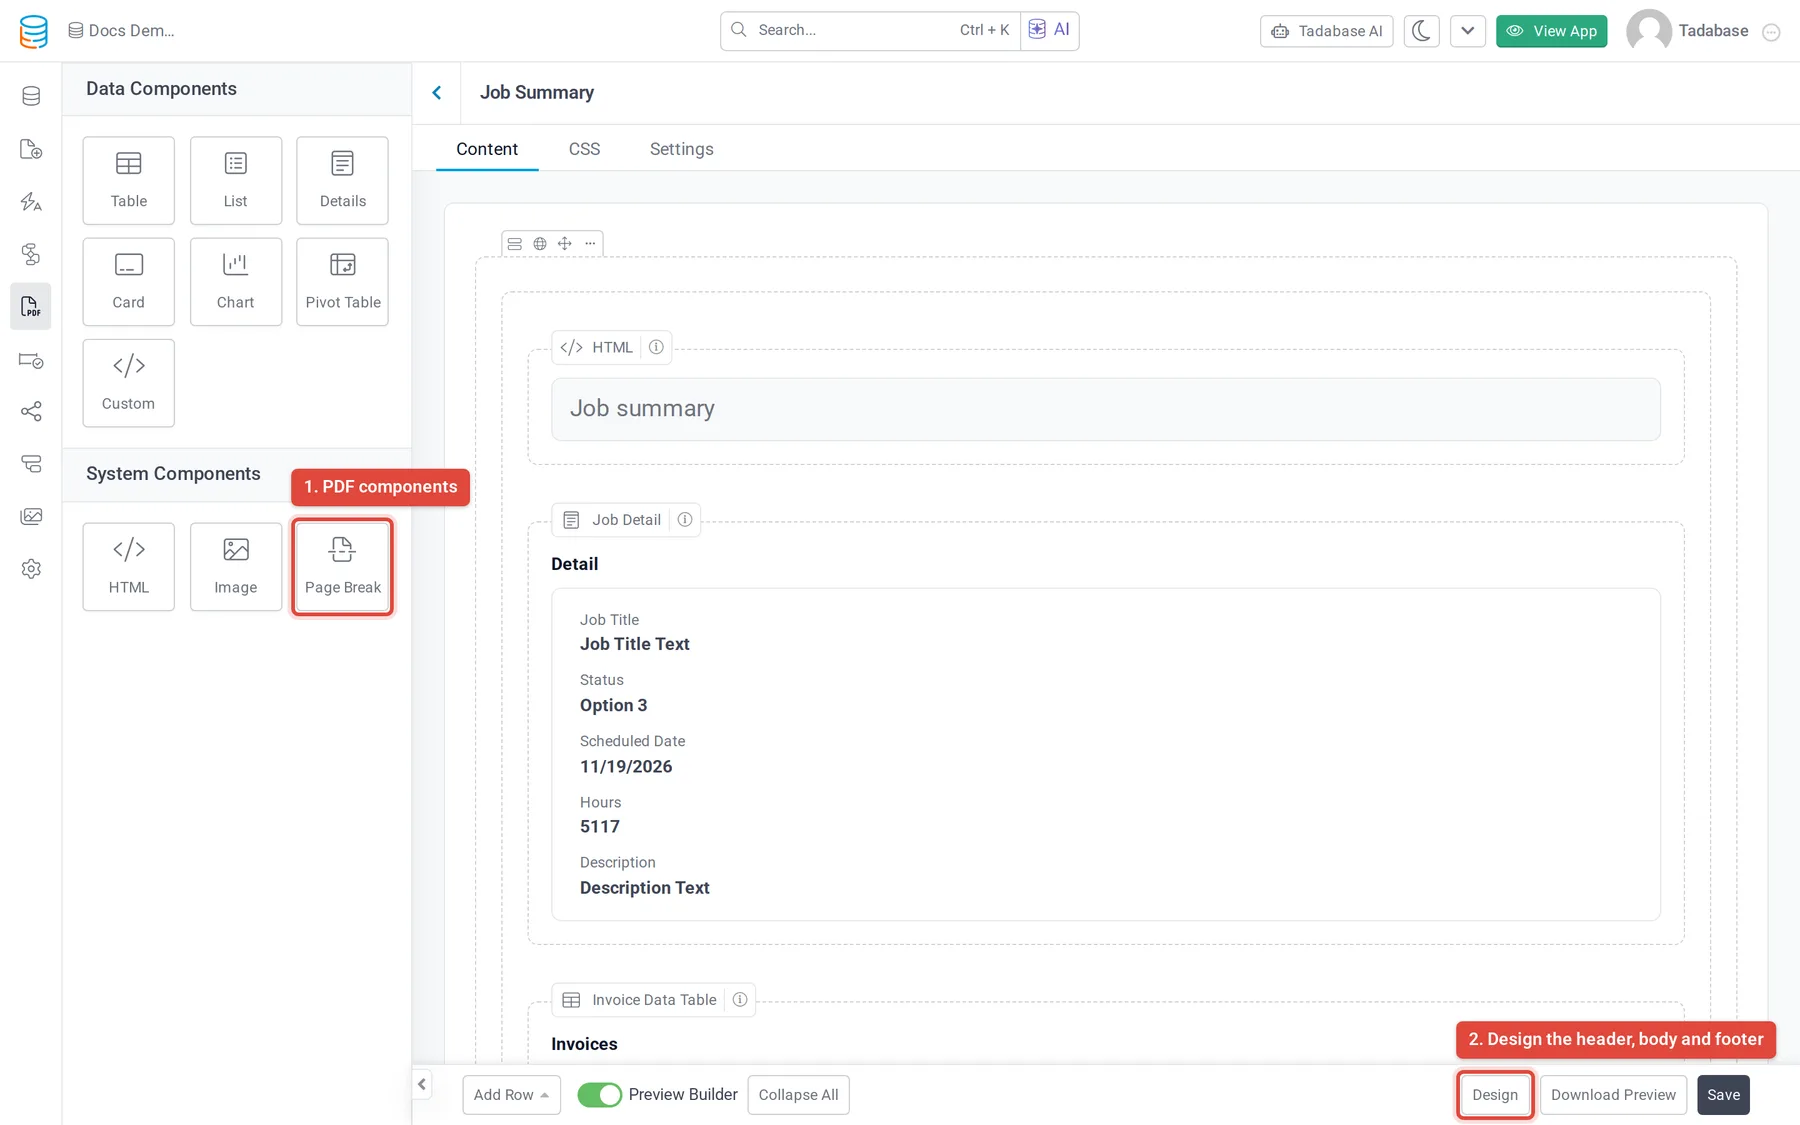
A Page Break starts a new sheet of paper at that point in the PDF.
Layout, theme and CSS #
- Layout: on the Settings tab, choose a PDF Layout. The layout sets the paper size, orientation, margins, background, header and footer. Add/Edit Layouts opens the PDF Layouts list. See Set up PDF layouts.
- Theme: the theme is part of the layout. To style everything yourself, set the layout's theme to Unformatted - I want to use custom CSS.
- CSS: the CSS tab of the PDF Page holds CSS for this page. If you give a component a CSS class, define that class here.
- Design: the Design button on the Content tab opens the PDF Design window. Choose Header, Body or Footer, see it on the Preview tab, edit its HTML on the HTML tab (the body's HTML is read-only) and its CSS in the editor on the right. On a Detail page, pick a record to preview with. Click Save.
Once you save a design in the PDF Design window, the CSS tab shows a notice that CSS is now managed through the design, with a Reset button that removes the custom design and goes back to the CSS tab's settings.
File name and other settings #
The Settings tab holds the page's Name, Description, Data Table (Detail pages, shown but not changeable) and PDF Layout, plus:
| Setting | Options |
|---|---|
| Custom File Name | Text: type a File Name. Field (Detail pages): use a field of the record. Default: the standard name. |
Click Save at the bottom of the tab after changing settings.
How people get the PDF #
- PDF Print button: add the PDF Print component to an app page. See Add a PDF Print button to a page. This is the only way to print a List PDF Page in the live app.
- Connected PDF link (Detail pages): in a Table, List or Details component, add a Connected PDF link and pick the PDF Page in Link to PDF Page. Each record gets a link to its own PDF. The option appears when a Detail PDF Page exists for the component's table, or for a table it has a one-to-one connection to.
- Form email (Detail pages): a form can generate the PDF and attach it to its notification email. See Attach a PDF to an email.
- Workflow (Detail pages): the Create PDF Page action prints the PDF for a record, so later steps can save or email it. Choose the Record source, then the PDF Page. See Document actions.
Check that it worked #
Click Download Preview on the list or in the editor to see the PDF. The Logs tab of the PDF Page lists each time it was printed:
| Column | What it shows |
|---|---|
| When | Date and time of the print |
| From | Where it was printed, such as Builder, Live app, Workflow or Form email |
| Printer | The print engine that made it |
| Status | Printed, Refused or Failed, with the error under a failed print |
| Time | How long it took, in seconds |
| Size | Size of the PDF |
Duplicate or delete a PDF Page #
- Duplicate: in the PDF Pages list, click Duplicate on the page's row. The copy counts toward your plan's number of PDF Pages.
- Delete: open the PDF Page, go to the Settings tab and click Delete, then confirm. Remove PDF Print buttons, Connected PDF links and workflow steps that use the page as well.
Plans #
PDF Pages need a plan that includes them, and each plan allows a set number of PDF Pages. When you reach it, Add New PDF Page is replaced by an upgrade button. The Create PDF Page workflow action also needs a plan that allows PDF generation in workflows. See Plans.
PDF Pages 2.0 and the older alpha PDF pages #
This page used to be called PDF Pages 2.0. The older PDF pages, where each app page had its own PDF tab and Alpha features had to be on, are no longer available in new apps and are not covered here.
Was this page helpful?
Something wrong or missing on this page? Tell us.